Advanced Cluster Security for Kubernetes (ACS)
- Advanced Cluster Security for Kubernetes (ACS)
Installation
Central Installation
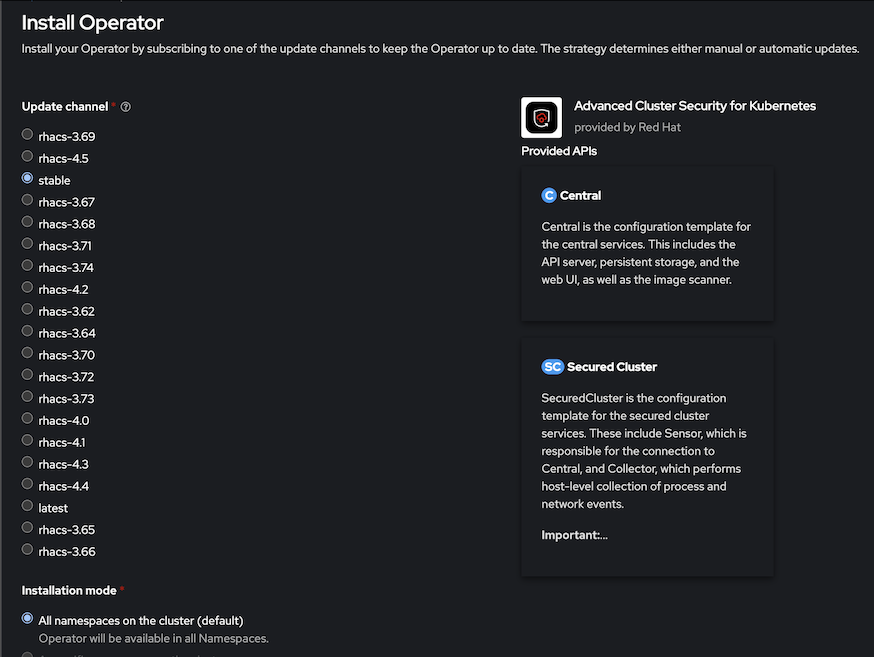
Install Operator
- Web Console
- Select Advanced Cluster Security for Kubernetes
- Web Console

- Accept default parameters
Use CLI to install operator
oc create -f manifests/acs-subscription.yaml
oc get csv -n rhacs-operator
Output
namespace/rhacs-operator created
operatorgroup.operators.coreos.com/rhacs-operator-bqbtj created
subscription.operators.coreos.com/rhacs-operator created
NAME                     DISPLAY                                    VERSION        REPLACES                   PHASE
rhacs-operator.v4.5.0    Advanced Cluster Security for Kubernetes   4.5.0          rhacs-operator.v4.4.0       Succeeded
Remark: It should be better if you choose Manual for Update Approval instead of Automatic for production environment
Install roxctl CLI
Download latest binary from here
For OSX
curl https://mirror.openshift.com/pub/rhacs/assets/latest/bin/Darwin/roxctl -o roxctlOr use roxctl from container
podman run docker://quay.io/stackrox-io/roxctl <parameter>
Create ACS Central with acs-central.yaml
If you want to use custom certificate storedfor central add following section to acs-central.yaml
spec:
  central:
    defaultTLSSecret:
      name: acs-central
Create Central
oc create -f manifests/acs-central.yamlRemark
- Central is configured with memory limit 8 Gi
- Default RWO storage for central is 100 GB
Output
central.platform.stackrox.io/stackrox-central-services createdCheck status
oc describe central/stackrox-central-services -n stackrox
watch oc get pods -n stackrox
Output
NAME                          READY   STATUS    RESTARTS   AGE
central-9c5567677-s9ggb       1/1     Running   0          2m44s
central-db-77b8c8d6c9-2jcr2   1/1     Running   0          2m44s
scanner-566f5f5b5b-d6t6d      1/1     Running   0          2m44s
scanner-566f5f5b5b-tfgng      1/1     Running   0          2m44s
scanner-db-69cd9c4949-hpc4f   1/1     Running   0          2m44s
Check PVC
oc get pvc -n stackroxOutput
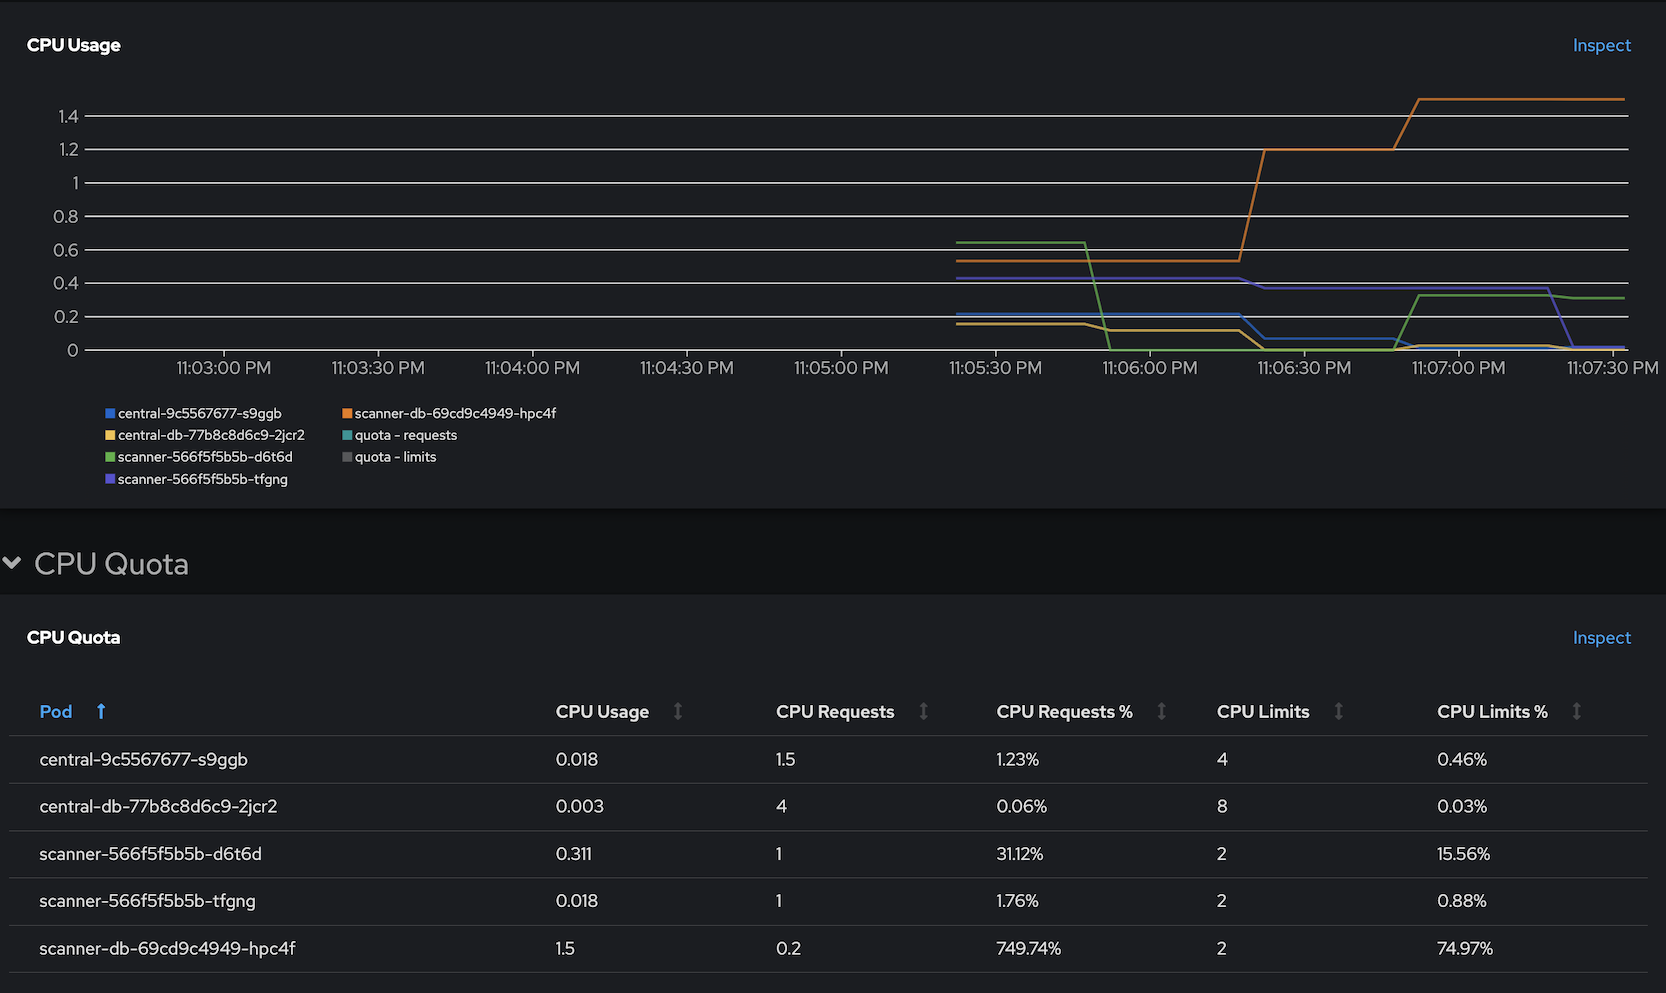
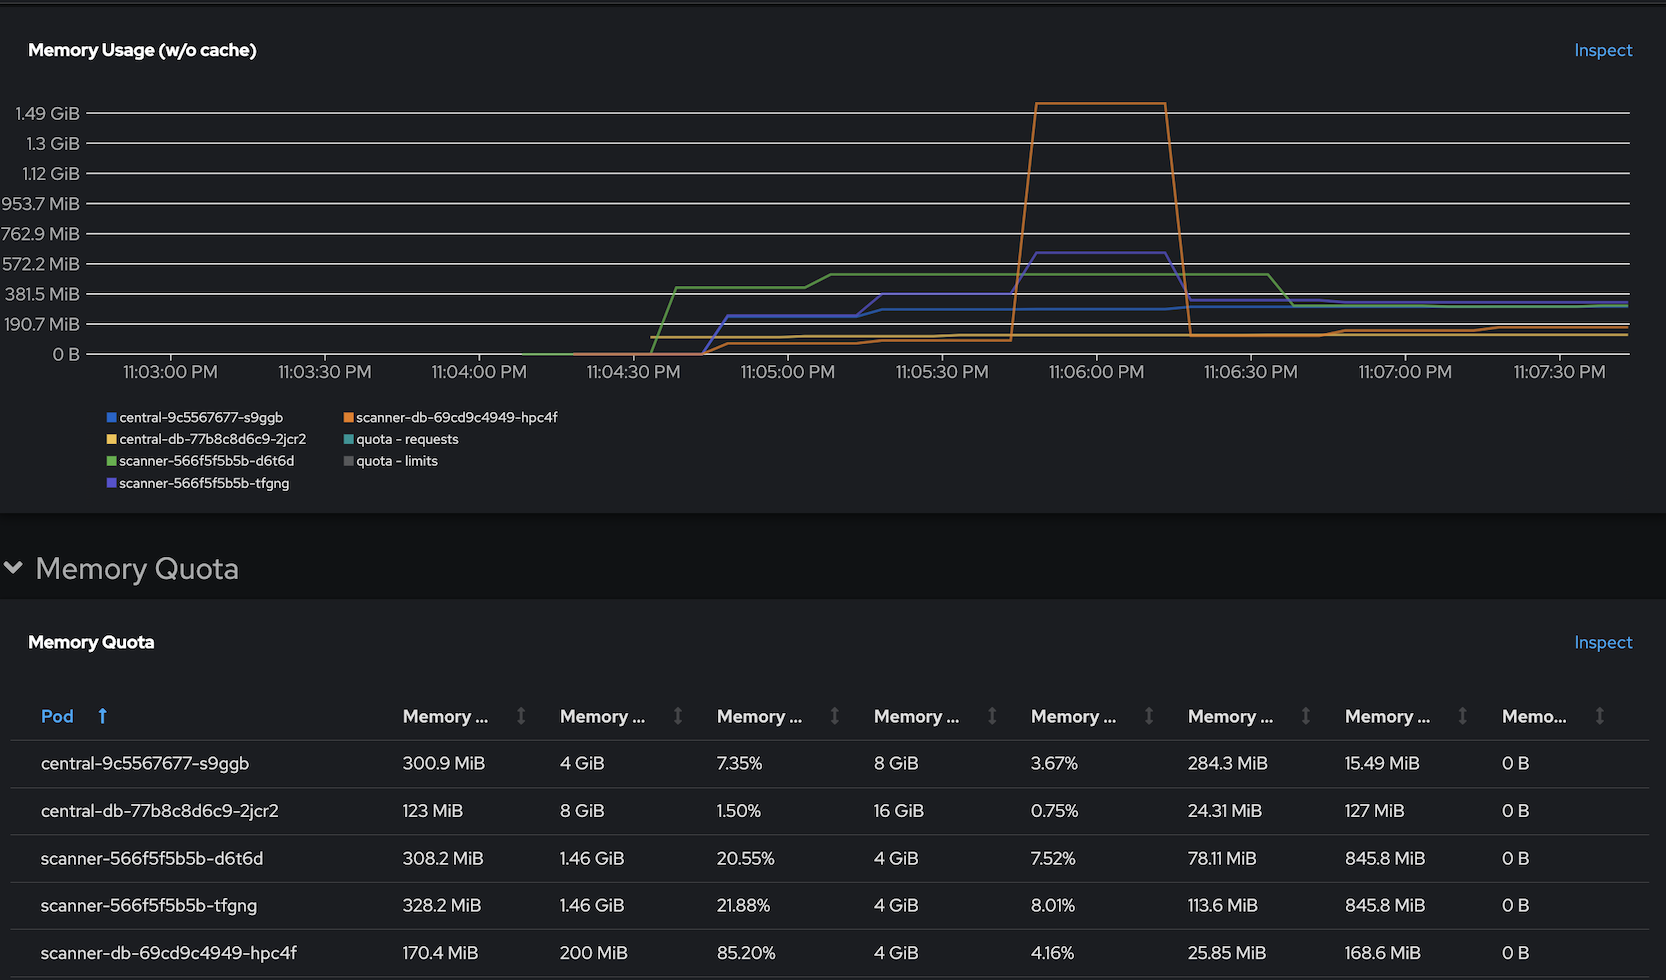
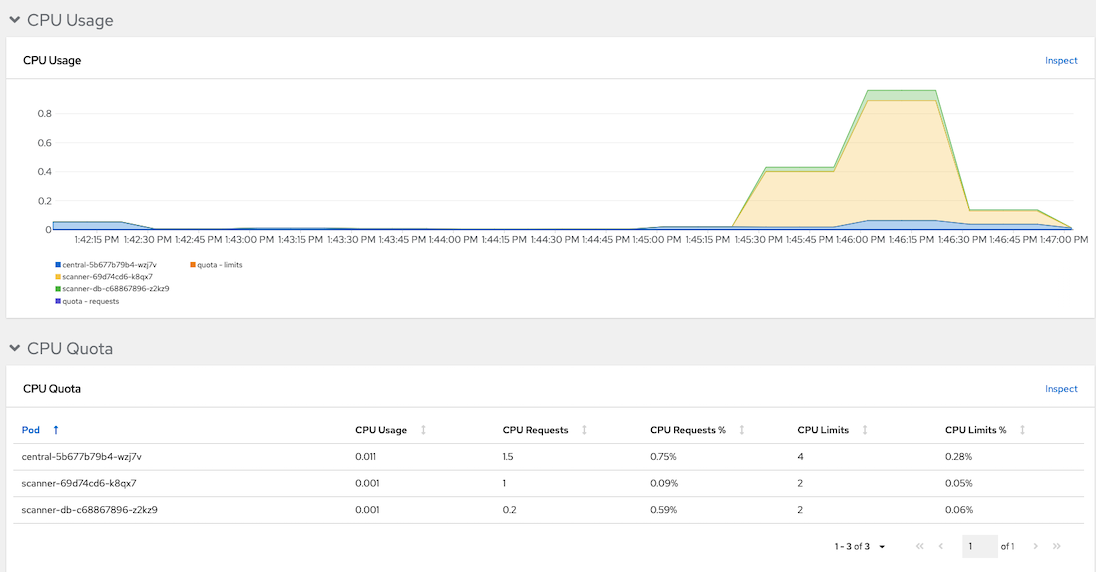
NAME         STATUS   VOLUME                                     CAPACITY   ACCESS MODES   STORAGECLASS   AGE
central-db   Bound    pvc-a4b5a0ec-7e28-495c-860c-c715aefd836c   100Gi      RWO            gp3-csi        100s
Resources consumed by ACS central
CPU
Memory
[Optional] Create Central at Infra Nodes
Infra Nodes preparation
Label Infra nodes
oc label node <node> node-role.kubernetes.io/infra=""
oc label node <node> node-role.kubernetes.io/acs=""
Taint infra nodes with infra-acs
oc adm taint node <node> infra-acs=reserved:NoSchedule
Create Central with acs-central-infra.yaml
oc create -f manifests/acs-central-infra.yaml -n stackrox
Access Central
URL and password to access ACS Console with user admin
ROX_URL=https://$(oc get route central -n stackrox -o jsonpath='{.spec.host}')
ROX_CENTRAL_ADDRESS=$(oc get route central -n stackrox -o jsonpath='{.spec.host}'):443
ROX_PASSWORD=$(oc get secret central-htpasswd -n stackrox -o jsonpath='{.data.password}'|base64 -d)
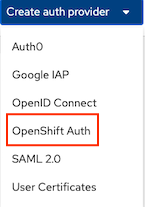
Single Sign-On with OpenShift
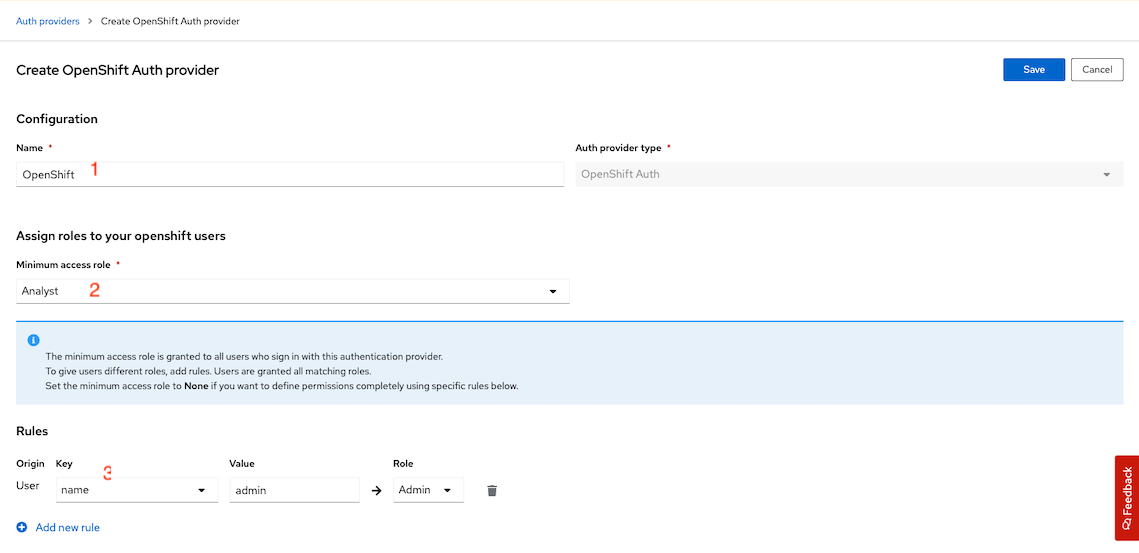
Navigate to Platform Configuration -> Access Control then click Create auth Provider and select OpenShift Auth
Input configuration then click save
- Name: OpenShift
- Minium access role: Analyst
Rules: mapped spcific user to Admin role
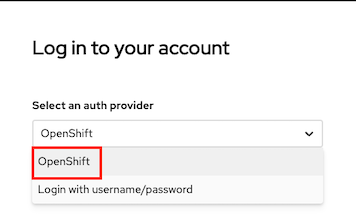
Logout and refresh your browser. OpenShift provider will be available for you to login with OpenShift's user account
Secured Cluster Services (Managed Cluster)
Operator
- Login to ACS console
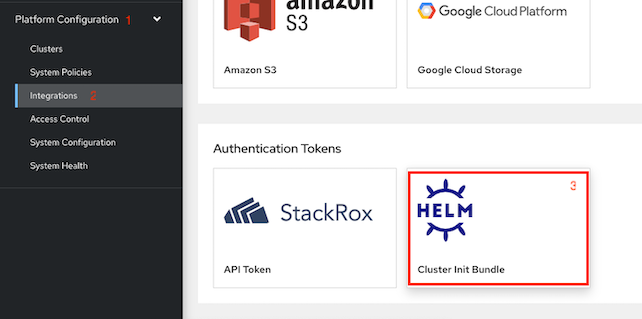
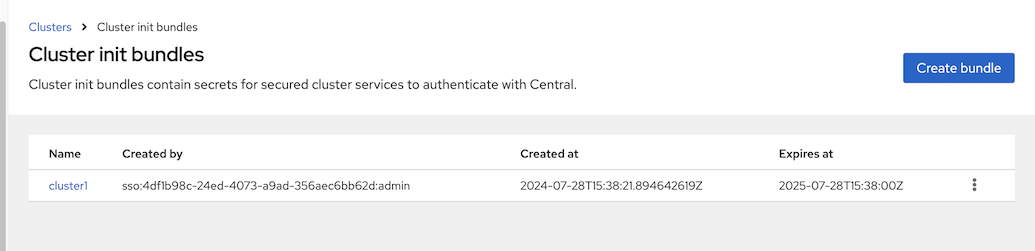
Generate cluster init bundle
Platform Configuration -> Integrations -> Cluster Init Bundle -> Generate Bundle
Input cluster name
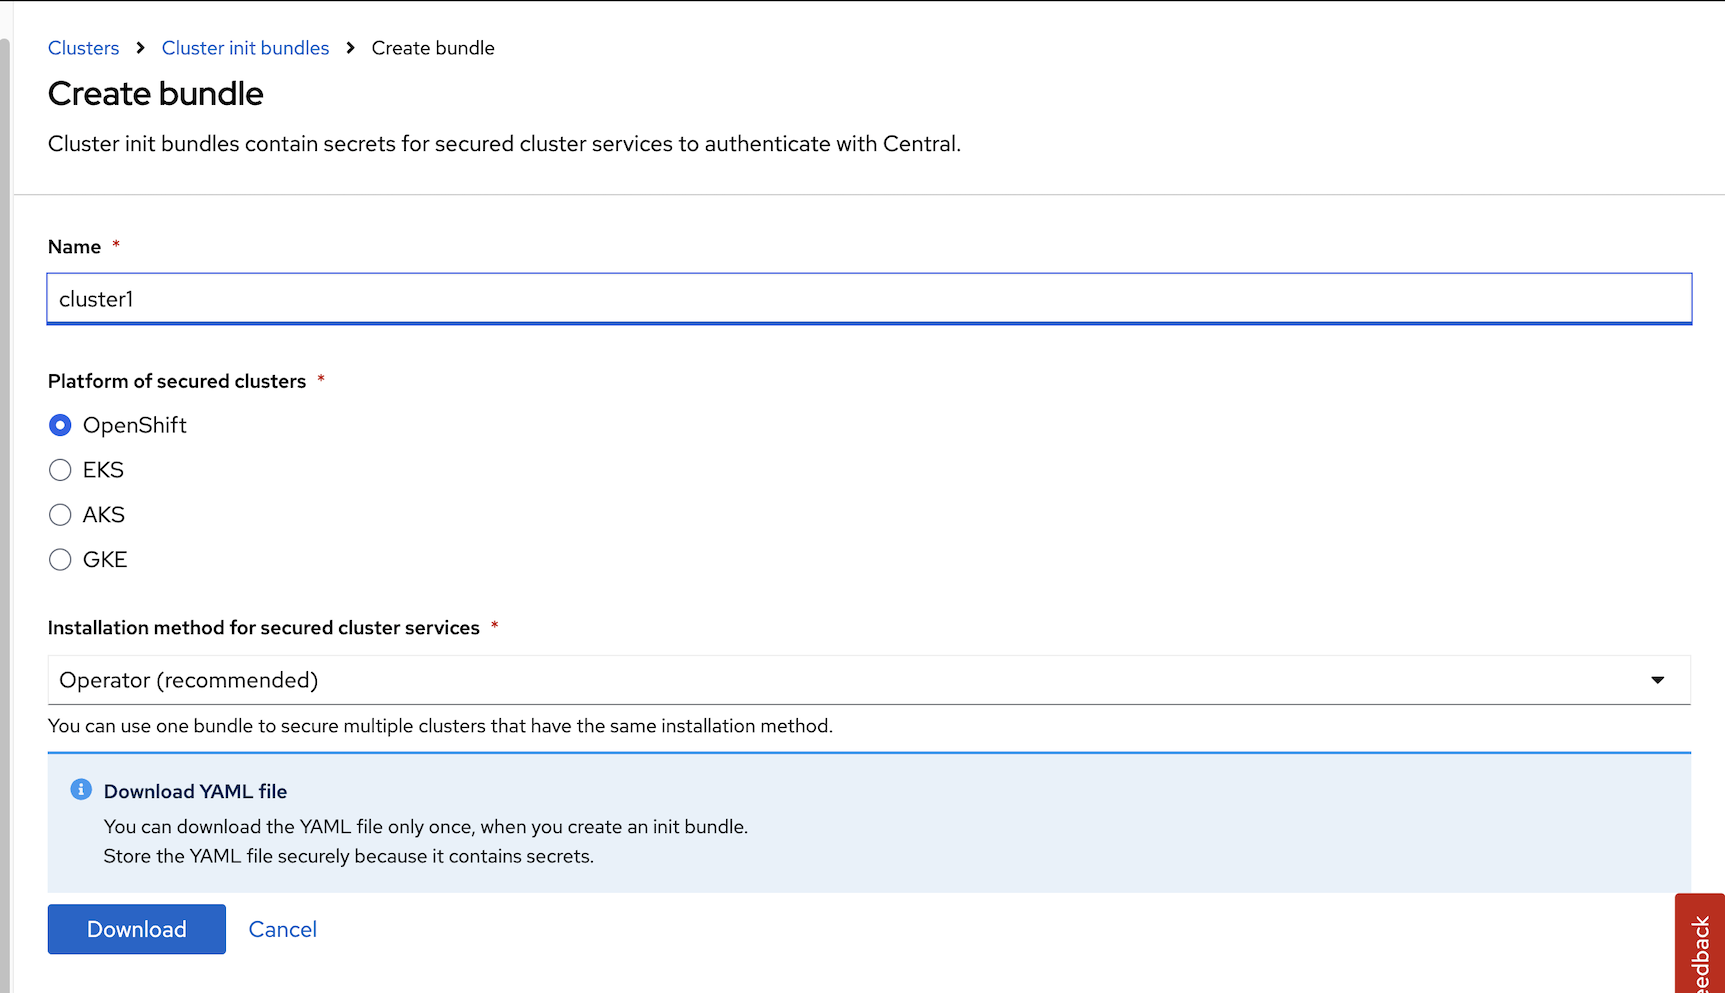
download Kubernetes Secrets file for installation with Operator or Helm values file for installation with roxctl
Create namespace for Secured Cluster Services
oc new-project stackrox-secured-clusterCreate secret from previously downloaded Kubernetes Secrets file
oc create -f cluster1-Operator-secrets-cluster-init-bundle.yaml -n stackrox-secured-clusterOutput
secret/admission-control-tls created
secret/collector-tls created
secret/sensor-tls created
Install Secure Cluster Services on local cluster
Create Secured Cluster Service with acs-secured-cluster.yaml
oc create -f manifests/acs-secured-cluster.yaml -n stackrox-secured-clusterRemark: acs-secured-cluster.yaml is prepared for install Secured Cluster Service within the same cluster with Central.
If you want Admission Control run on Infra Nodes with acs-secured-cluster-infra.yaml
oc create -f manifests/acs-secured-cluster-infra.yaml -n stackrox-secured-clusterCheck status
oc get securedcluster/cluster1  -n stackrox-secured-cluster -o jsonpath='{.status.conditions[0]}'
echo "\n"
oc get pods -n stackrox-secured-cluster
Output
{"lastTransitionTime":"2024-07-28T15:50:59Z","message":"StackRox Secured Cluster Services 4.5.0 has been installed.\n\n\n\nThank you for using StackRox!\n","reason":"InstallSuccessful","status":"True","type":"Deployed"}

NAME                                 READY   STATUS    RESTARTS   AGE
admission-control-7c68c4f7b4-kgblg   1/1     Running   0          62s
admission-control-7c68c4f7b4-phdj8   1/1     Running   0          62s
admission-control-7c68c4f7b4-tfj2g   1/1     Running   0          61s
collector-hcvnc                      3/3     Running   0          61s
collector-jkg44                      3/3     Running   0          62s
collector-t225q                      3/3     Running   0          61s
collector-vxpmv                      3/3     Running   0          62s
collector-wcwxv                      3/3     Running   0          62s
collector-wt5vb                      3/3     Running   0          61s
scanner-7bbc488778-2hvkp             1/1     Running   0          62s
scanner-7bbc488778-l8vf2             1/1     Running   0          62s
scanner-7bbc488778-xzjr2             1/1     Running   0          62s
scanner-db-97dbbf44-2j6vw            1/1     Running   0          62s
sensor-7c49b87f4f-8jx2t              1/1     Running   0          62s
Remark
- Adminission control is high availability with default 3 pods
- Collector is run on every nodes including control plane
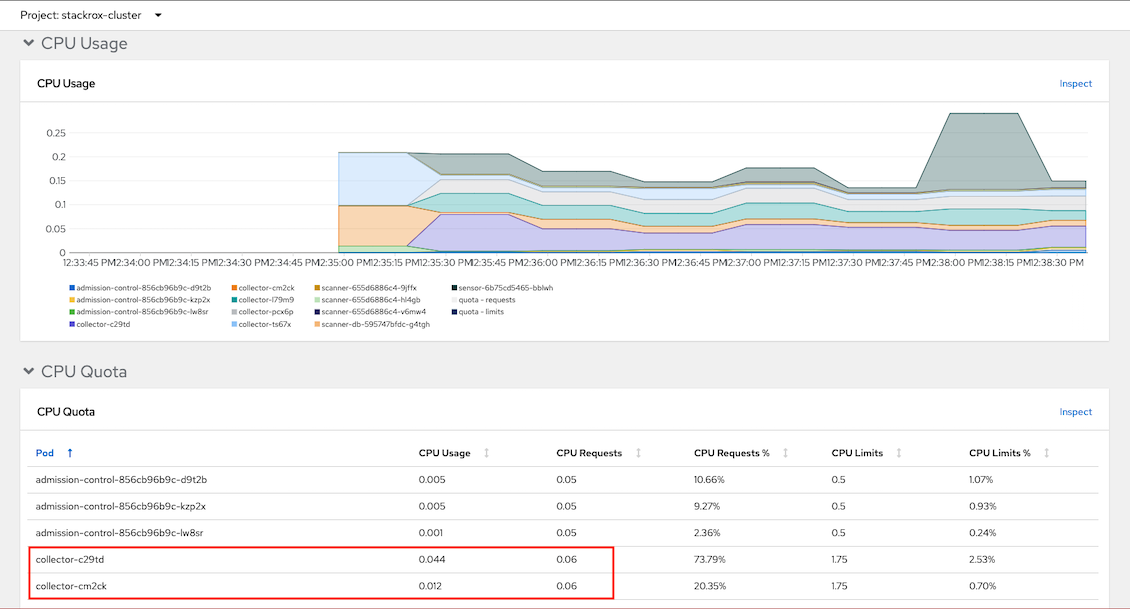
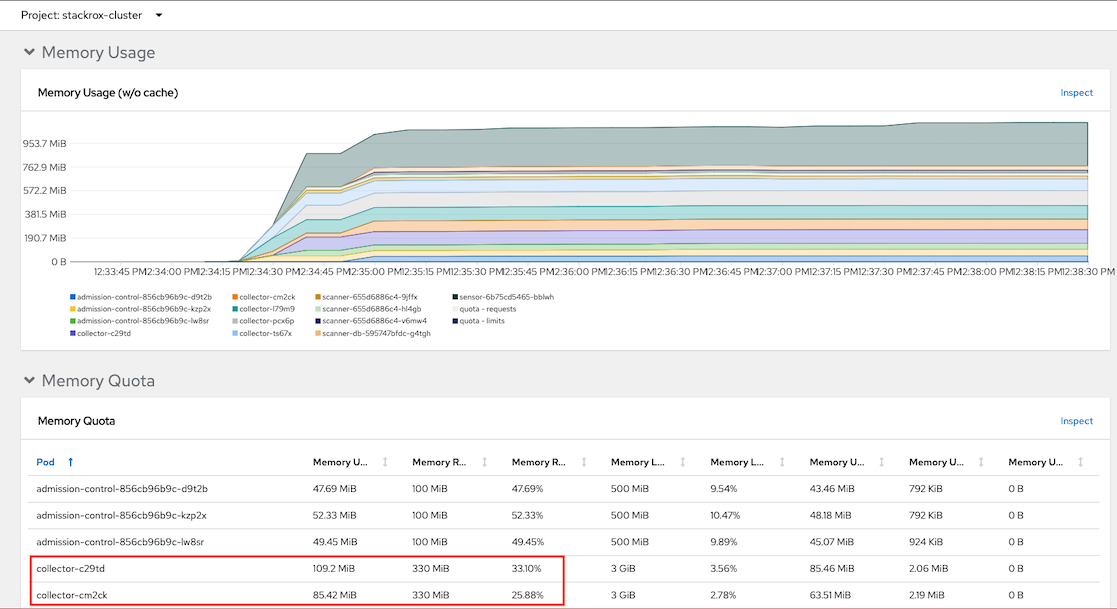
Resources consumed by admission control and collector
CPU
Memory
Install Secure Cluster Services on remote cluster
- Generate cluster init bundle
Create secret from previously downloaded Kubernetes Secrets file
oc new-project stackrox-secured-cluster oc create -f cluster2-cluster-init-secrets.yaml -n stackrox-secured-cluster- Install ACS operator
Create Secured Cluster Service with centralEndpoint set to Central's route.
Get Central's route and save to ROX_HOST environment variable
ROX_HOST=$(oc get route central -n stackrox -o jsonpath='{.spec.host}')Login to remote cluster and run following command.
  cat manifests/acs-secured-cluster.yaml | \
  sed 's/central.stackrox.svc/'$ROX_HOST'/' | \
  sed s/cluster1/cluster2/ | \
  oc create -n stackrox-secured-cluster -f -
CLI roxctl and Helm
Create authentication token
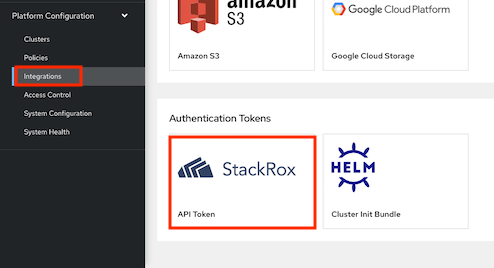
Login to Central
echo "ACS Console: https://$(oc get route central -n stackrox -o jsonpath='{.spec.host}')"Platform Configuration -> Integrations -> Authentication Tokens. Select StackRox API Token then generate token and copy token to clipboard
- Token Name: admin
- Role: Admin
Set environment variable
  export ROX_API_TOKEN=<api-token>
  export ROX_CENTRAL_ADDRESS=$(oc get route central -n stackrox -o jsonpath='{.spec.host}'):443
Add Helm repository
helm repo add rhacs https://mirror.openshift.com/pub/rhacs/charts/Install Secure Cluster Services on local cluster
Generate cluster init bundle
CLUSTER_NAME=cluster1
roxctl --insecure-skip-tls-verify -e "$ROX_CENTRAL_ADDRESS" central init-bundles generate $CLUSTER_NAME \
--output $CLUSTER_NAME-init-bundle.yaml
Example of output
INFO:    Successfully generated new init bundle.

  Name:       cluster1
  Created at: 2022-05-22T07:43:47.645062387Z
  Expires at: 2023-05-22T07:44:00Z
  Created By: admin
  ID:         84c50c04-de36-450d-a5d6-7a23f1dd563c

INFO:    The newly generated init bundle has been written to file "cluster1-init-bundle.yaml".
INFO:    The init bundle needs to be stored securely, since it contains secrets.
INFO:    It is not possible to retrieve previously generated init bundles.
Create collectors
helm install -n stackrox-cluster --create-namespace stackrox-secured-cluster-services rhacs/secured-cluster-services \
-f ${CLUSTER_NAME}-init-bundle.yaml \
--set clusterName=${CLUSTER_NAME} \
--set imagePullSecrets.allowNone=true
Install Secure Cluster Services on Remote cluster
Generate cluster init bundle
CLUSTER_NAME=cluster2
roxctl --insecure-skip-tls-verify -e "$ROX_CENTRAL_ADDRESS" central init-bundles generate $CLUSTER_NAME \
--output $CLUSTER_NAME-init-bundle.yaml
Create collectors
helm install -n stackrox --create-namespace stackrox-secured-cluster-services rhacs/secured-cluster-services \
-f ${CLUSTER_NAME}-init-bundle.yaml \
--set centralEndpoint=${ROX_CENTRAL_ADDRESS} \
--set clusterName=${CLUSTER_NAME} \
--set imagePullSecrets.allowNone=true
Check collector pods
oc get pods -n stackrox -l app=collector,app.kubernetes.io/name=stackroxOutput
NAME              READY   STATUS    RESTARTS   AGE
collector-5hmzt   2/2     Running   0          87s
collector-dmpps   2/2     Running   0          87s
collector-ffpdg   2/2     Running   0          87s
collector-rfkq2   2/2     Running   0          87s
collector-x4gtb   2/2     Running   0          87s
View Managed Cluster
Check ACS Console
Dashboard
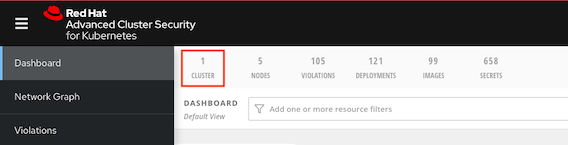
Platform Configuration -> Clusters

Overall status
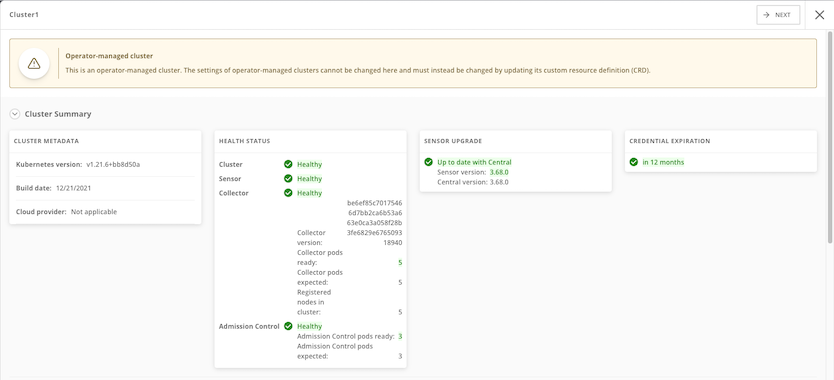
Dynamic configuration

Helm-managed cluster

Integration with Nexus
Setup Nexus
Create namespace
oc new-project ci-cdCreate nexus
cd bin
./setup_nexus.sh
Example of output
expose port 5000 for container registry
service/nexus-registry exposed
route.route.openshift.io/nexus-registry created
NEXUS URL = nexus-ci-cd.apps.cluster-**tlc.com
NEXUS User admin: *****
NEXUS User jenkins: **********
Nexus password is stored at nexus_password.txt
Login to nexus with user admin and initial password and set new admin password.
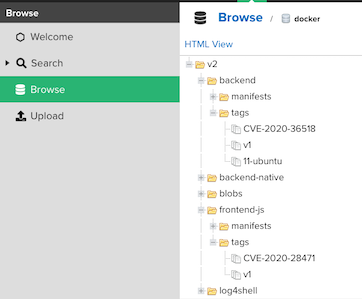
- Browse repository
Copy sample container images to nexus
NEXUS=$(oc get route nexus-registry -n ci-cd -o jsonpath='{.spec.host}')/repository/container
allImages=(backend:v1 backend:native backend:CVE-2020-36518 frontend-js:v1 frontend-js:node log4shell:latest backend-native:distroless)
for image in $allImages
do
  echo "############## Copy $image ##############"
  podman run quay.io/skopeo/stable \
  copy --src-tls-verify=true \
  --dest-tls-verify=false \
  --src-no-creds \
  --dest-username admin \
  --dest-password $NEXUS_PASSWORD \
  docker://quay.io/voravitl/$image \
  docker://$NEXUS/$image
  echo "##########################################"
done
Check Nexus docker repository
Config ACS
- Login to ACS Central
Platform Configuration -> Integrations -> Sonatype Nexus -> New Integration
Check for Nexus Container Registry address
echo "Endpoint: $(oc get route nexus-registry -n ci-cd -o jsonpath='{.spec.host}')"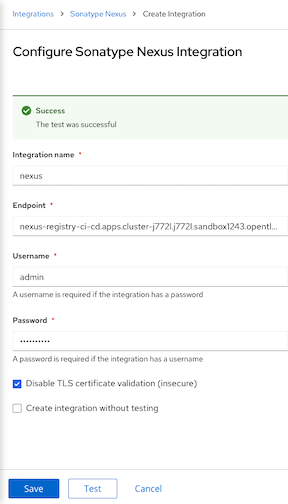
- Input User, Password and Nexus Registry address then click Test and Save
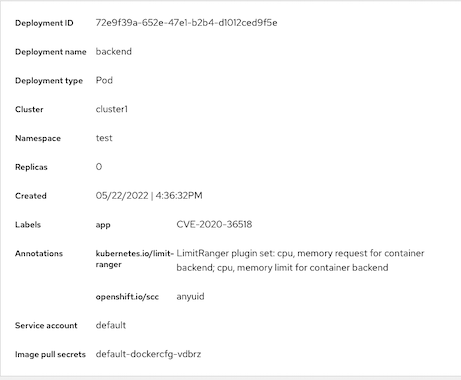
Container Image with Vulnerabilities
Deploy sample application
  oc new-project test
  oc run log4shell --labels=app=log4shell --image=$(oc get route nexus-registry -n ci-cd -o jsonpath='{.spec.host}')/log4shell:latest -n test
  oc run backend --labels=app=CVE-2020-36518 --image=$(oc get route nexus-registry -n ci-cd -o jsonpath='{.spec.host}')/backend:CVE-2020-36518 -n test
  watch oc get pods -n test
Check ACS Dashboard.
1 Criticals violation will be found.
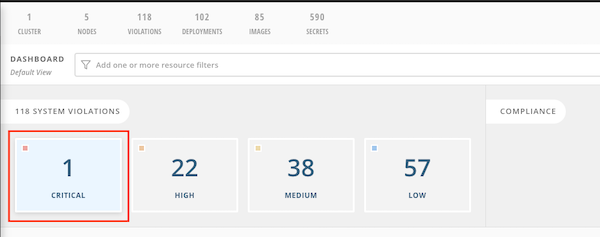
Drill down for more information

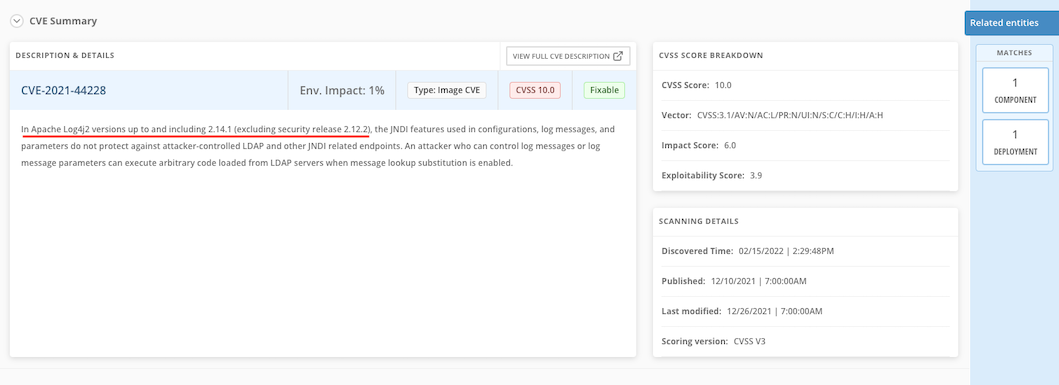
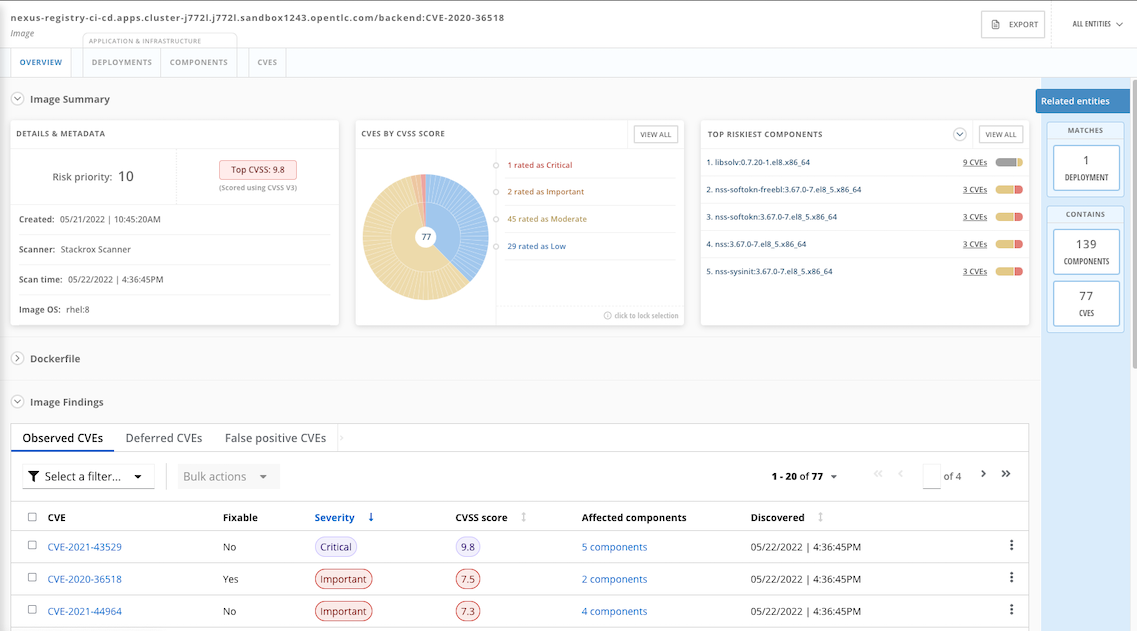
CVE Information
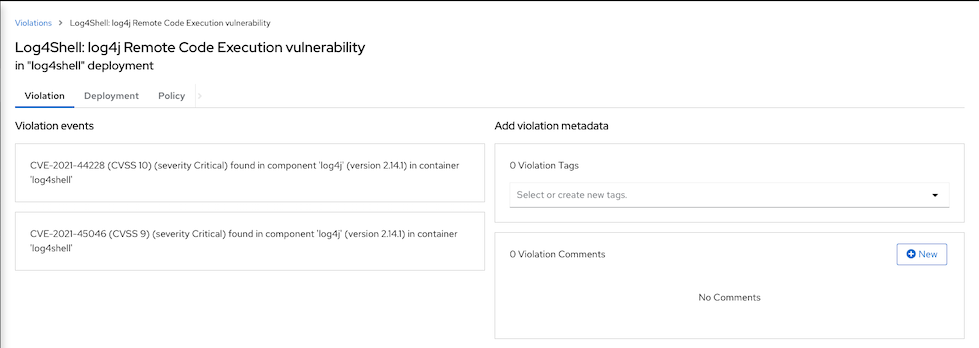
CVSS score: https://nvd.nist.gov/vuln-metrics/cvss
- Search by CVE. Vulnerability Management -> Dashboard -> IMAGES -> Search for CVE-2021-44228

Details information
Naviate to Violations, You will find Fixable at least important that is alert for deployment with fixable vulnerbilities on backend deployment
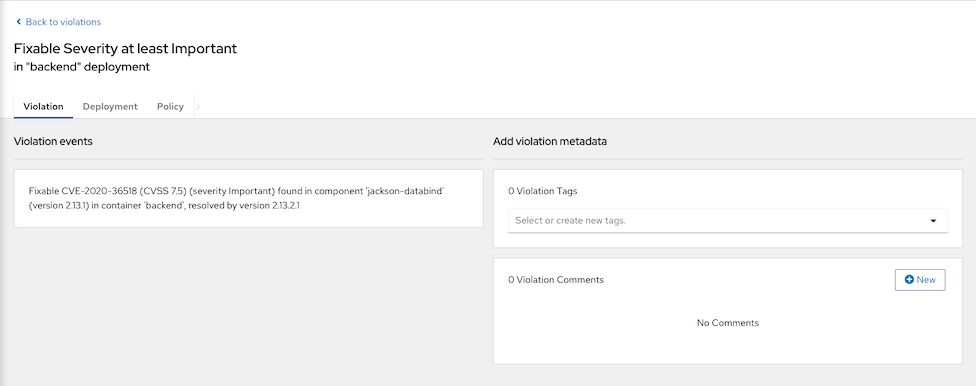
Affected deployment
Drilled down to integrated nexus
Shift Left Security
kube-linter
Try kube-linter with deployment YAML
kube-linter lint manifests/mr-white.yamlDownload kube-linter from this link
Sample recommendation
``` KubeLinter 0.6.5
manifests/mr-white.yaml: (object:
/mr-white apps/v1, Kind=Deployment) environment variable SECRET in container "mr-white" found (check: env-var-secret, remediation: Do not use raw secrets in environment variables. Instead, either mount the secret as a file or use a secretKeyRef. Refer to https://kubernetes.io/docs/concepts/configuration/secret/#using-secrets for details.) manifests/mr-white.yaml: (object:
/mr-white apps/v1, Kind=Deployment) The container "mr-white" is using an invalid container image, "quay.io/voravitl/mr-white:latest". Please use images that are not blocked by the BlockListcriteria : [".:(latest)$" "^:$" "(.*/:]+)$" (check: latest-tag, remediation: Use a container image with a specific tag other than latest.)manifests/mr-white.yaml: (object:
/mr-white apps/v1, Kind=Deployment) container "mr-white" does not have a read-only root file system (check: no-read-only-root-fs, remediation: Set readOnlyRootFilesystem to true in the container securityContext.) manifests/mr-white.yaml: (object:
/mr-white apps/v1, Kind=Deployment) container "mr-white" is not set to runAsNonRoot (check: run-as-non-root, remediation: Set runAsUser to a non-zero number and runAsNonRoot to true in your pod or container securityContext. Refer to https://kubernetes.io/docs/tasks/configure-pod-container/security-context/ for details.) manifests/mr-white.yaml: (object:
/mr-white apps/v1, Kind=Deployment) container "mr-white" has cpu request 0 (check: unset-cpu-requirements, remediation: Set CPU requests and limits for your container based on its requirements. Refer to https://kubernetes.io/docs/concepts/configuration/manage-resources-containers/#requests-and-limits for details.) manifests/mr-white.yaml: (object:
/mr-white apps/v1, Kind=Deployment) container "mr-white" has cpu limit 0 (check: unset-cpu-requirements, remediation: Set CPU requests and limits for your container based on its requirements. Refer to https://kubernetes.io/docs/concepts/configuration/manage-resources-containers/#requests-and-limits for details.) manifests/mr-white.yaml: (object:
/mr-white apps/v1, Kind=Deployment) container "mr-white" has memory request 0 (check: unset-memory-requirements, remediation: Set memory requests and limits for your container based on its requirements. Refer to https://kubernetes.io/docs/concepts/configuration/manage-resources-containers/#requests-and-limits for details.) manifests/mr-white.yaml: (object:
/mr-white apps/v1, Kind=Deployment) container "mr-white" has memory limit 0 (check: unset-memory-requirements, remediation: Set memory requests and limits for your container based on its requirements. Refer to https://kubernetes.io/docs/concepts/configuration/manage-resources-containers/#requests-and-limits for details.)
Error: found 8 lint errors
- Try kube-linter with [backend-v1.yaml](manifests/backend-v1.yaml)

  ```bash
  kube-linter lint manifests/backend-v1.yaml
Output
manifests/backend.yaml: (object: <no namespace>/backend-v1 apps/v1, Kind=Deployment) container "backend" does not have a read-only root file system (check: no-read-only-root-fs, remediation: Set readOnlyRootFilesystem to true in the container securityContext.)
Container "backend" still does not have a read-only root file system because Vert.X still need to write /tmp then try backend deployment with emptyDir
Try agin with backend-v1-emptyDir.yaml which set readOnlyRootFilesystem to true
kube-linter lint manifests/backend-v1-emptyDir.yaml
Output
  KubeLinter 0.6.5

  No lint errors found!
Scan and check image with roxctl
Create token for DevOps tools
- Navigate to Platform Configuration -> Integrations -> Authentication Token -> API Token
- Click Generate Token
- Input token name and select role Continuous Integration
- Copy and save token.
Set API token to environment variable
export ROX_API_TOKEN=<token>
ROX_CENTRAL_ADDRESS=$(oc get route central -n stackrox -o jsonpath='{.spec.host}'):443
Scan image to check for vulnerbilities
roxctl --insecure-skip-tls-verify -e "$ROX_CENTRAL_ADDRESS" image scan --image $(oc get -n ci-cd route nexus-registry -o jsonpath='{.spec.host}')/backend:v1 --output=table
roxctl --insecure-skip-tls-verify -e "$ROX_CENTRAL_ADDRESS" image scan --image $(oc get -n ci-cd route nexus-registry -o jsonpath='{.spec.host}')/backend:CVE-2020-36518 --output=json| jq '.result.summary.CRITICAL'
Scan all images in Nexus registry
ROX_CENTRAL_ADDRESS=$(oc get route central -n stackrox -o jsonpath='{.spec.host}'):443
allImages=(backend:v1 backend:11-ubuntu backend:CVE-2020-36518 frontend-js:v1 frontend-js:node frontend-js:CVE-2020-28471 log4shell:latest backend-native:v1 backend-native:distroless)
for image in $allImages
do
    roxctl --insecure-skip-tls-verify -e "$ROX_CENTRAL_ADDRESS" image scan --image $(oc get -n ci-cd route nexus-registry -o jsonpath='{.spec.host}')/$image --output=table
done
Resources comsumed by ACS Central
Check images in image registry
Stackrox can check for vulnerbilities in libraries used by Java applicaion. Check for image backend:CVE-2020-36518
roxctl --insecure-skip-tls-verify \
-e "$ROX_CENTRAL_ADDRESS" image check \
--image $(oc get -n ci-cd route nexus-registry -o jsonpath='{.spec.host}')/backend:CVE-2020-36518 \
--output=table
Output
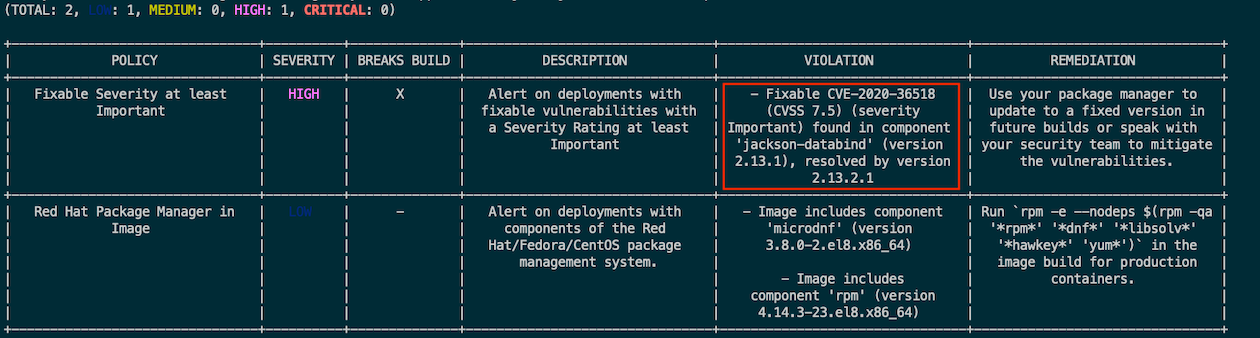
Remark: Column *BREAKS BUILD* indicate that this violation will be stop build process or not
Image backend:v1
roxctl --insecure-skip-tls-verify \
-e "$ROX_CENTRAL_ADDRESS" image check \
--image $(oc get -n ci-cd route nexus-registry -o jsonpath='{.spec.host}')/backend:v1 \
--output=table
Output

Deployment check
roxctl --insecure-skip-tls-verify -e "$ROX_CENTRAL_ADDRESS" deployment check --file=manifests/backend-bad-example.yaml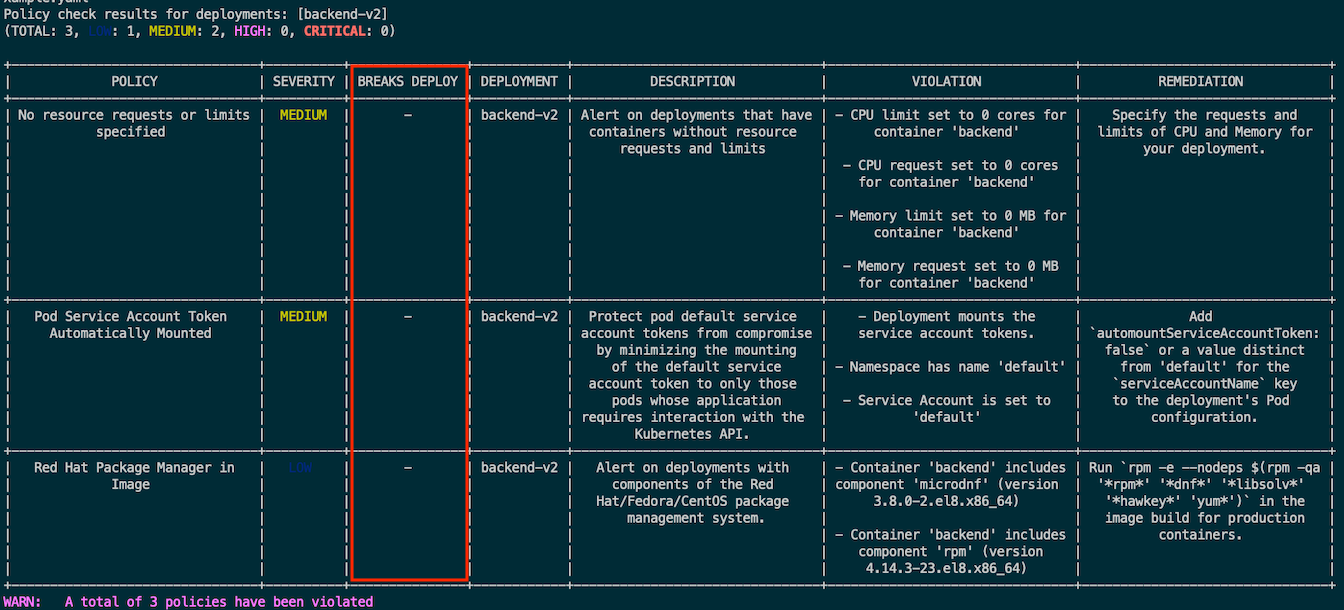
Remark: BREAKS DEPLOY column indicate that deployment will be blocked by ACS or not
Sample of Default Policies
Deploy Mr.White to namespace bad-ns
oc new-project bad-ns --display-name="This is Mr. White Namespace"
oc apply -f manifests/mr-white.yaml -n bad-ns
oc expose deploy mr-white -n bad-ns
oc expose svc mr-white -n bad-ns
MR_WHITE=$(oc get route mr-white -o jsonpath='{.spec.host}' -n bad-ns)
Run following command
curl http://$MR_WHITE/exec/whoami
curl http://$MR_WHITE/exec/useradd%20jessy-pinkman
curl http://$MR_WHITE/exec/groupadd%20van-cooking-station
oc exec -n bad-ns $( oc get po -o custom-columns='Name:.metadata.name' -n bad-ns --no-headers) -- pwd
Output
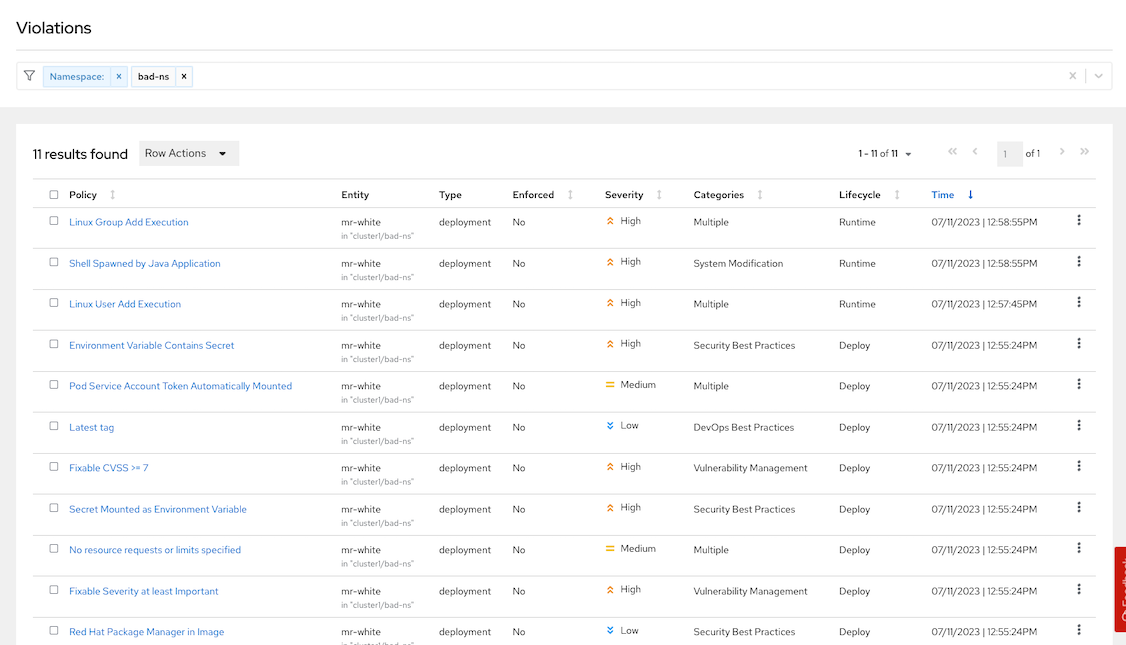
Check for policies
- Shell Spawned by Java Application
- Linux Group Add Execution
- Linux User Add Execution
- Environment Variable Contains Secret
- Secret Mounted as Environment Variable
- Kubernetes Actions: Exec into Pod
- Latest tag
Enforce policy on Buid Stage
Setup Jenkins and SonarQube
cd bin
./setup_cicd_projects.sh
./setup_jenkins.sh
./setup_sonar.sh
Remark: This demo need Nexus
Use roxctl in Pipeline
Create buildConfig backend-build-stackrox-pipeline with Jenkins.
cat manifests/backend-build-stackrox-pipeline.yaml| \
sed 's/value: NEXUS_REGISTRY/value: '$(oc get route nexus-registry -n ci-cd -o jsonpath='{.spec.host}')'/' | \
oc create -n ci-cd -f -
Create build config pipelines
oc create -f manifests/backend-build-stackrox-pipeline.yaml -n ci-cd
Create secret name stackrox-token in namespace ci-cd to store Stackrox API token
echo "...Token.." > token
oc create secret generic stackrox-token -n ci-cd --from-file=token
rm -f token
Login to Jenkins
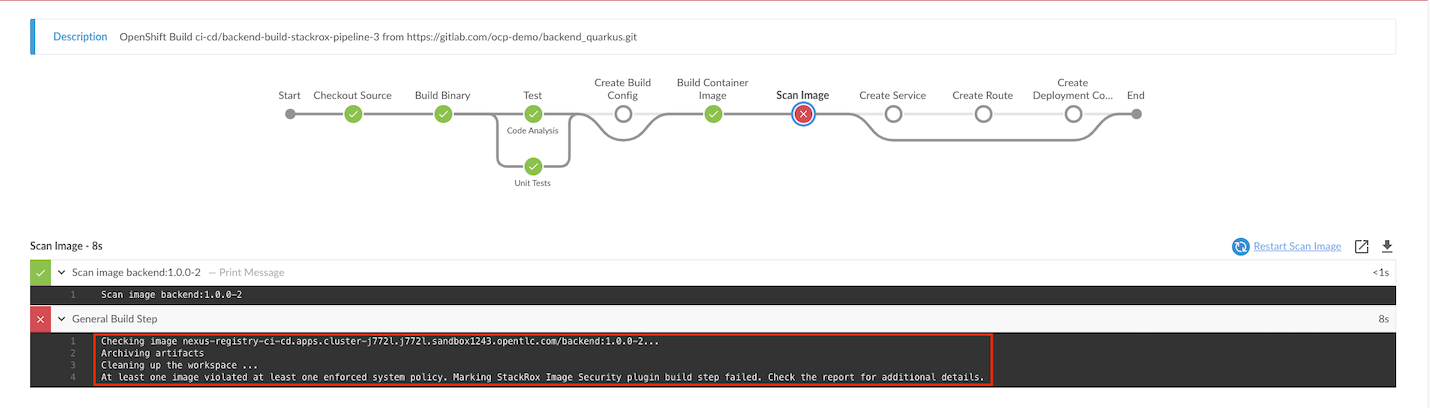
echo "Jenkins URL: https://$(oc get route jenkins -n ci-cd -o jsonpath='{.spec.host}')"Start backend-build-stackrox-pipeline. Pipeline will failed because image contains CVEs and violate policy Fixable Severity at least Important
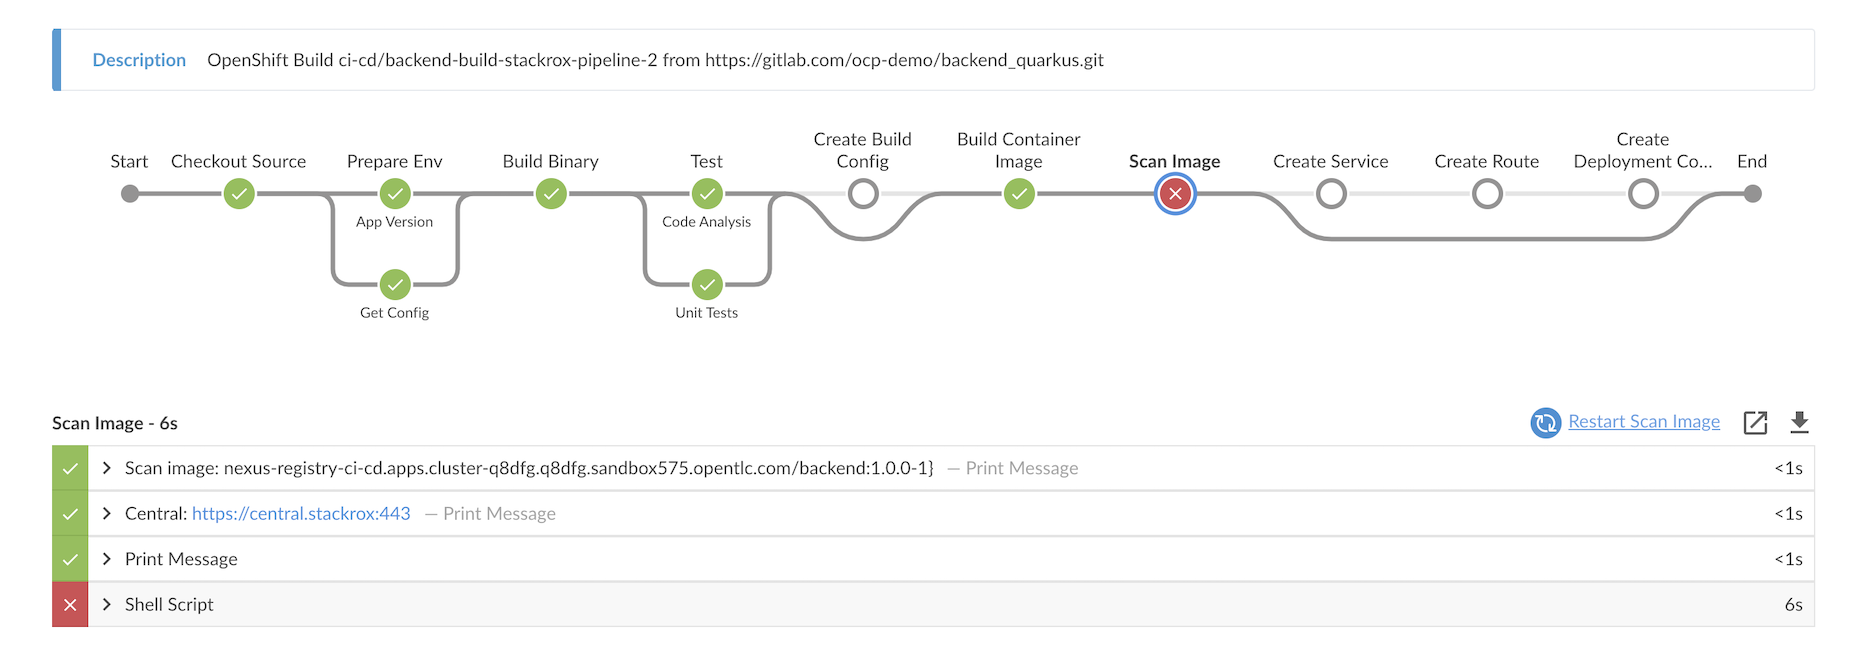
Detail
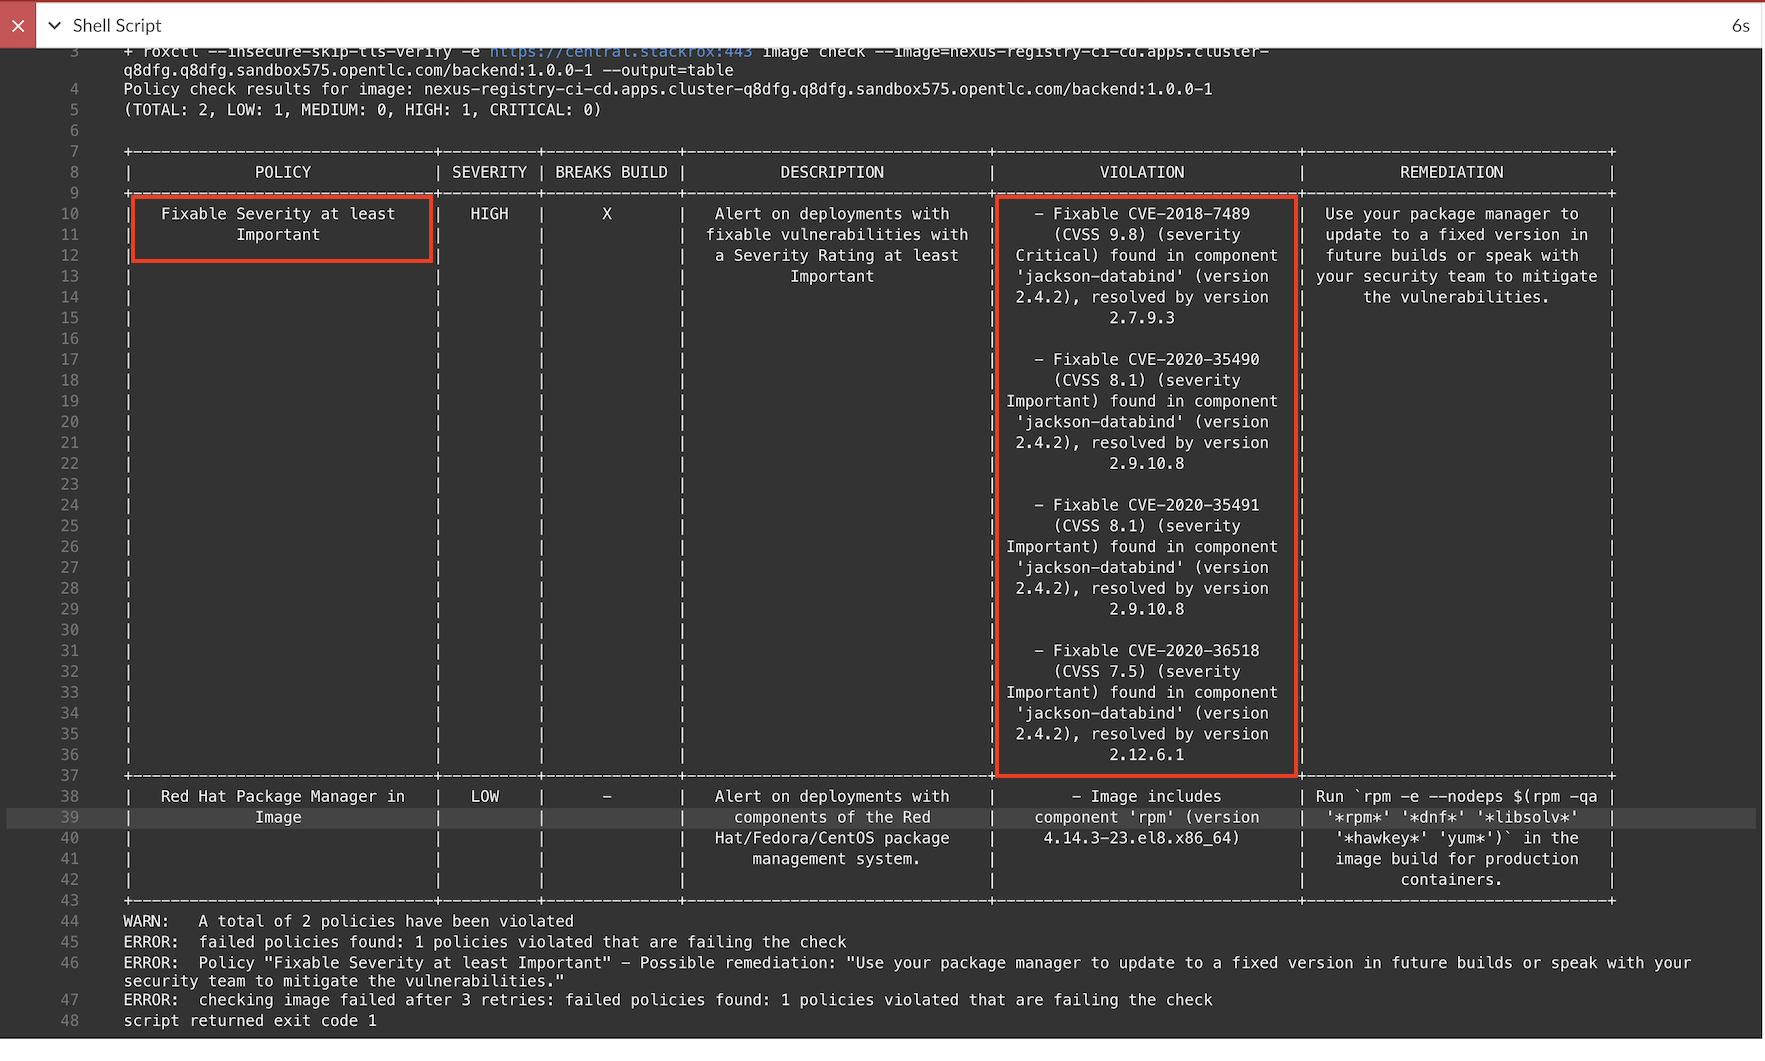
Remark:
Check backend-build-stackrox-pipeline Jenkinsfile for roxctl command in Pipeline.
  stage('Scan Image') {
      steps {
        container("tools") {
          echo "Scan image: ${NEXUS_REGISTRY}/${imageName}:${devTag}}"
          echo "Central: ${env.ROX_CENTRAL_ADDRESS}"
          sh "export ROX_API_TOKEN=${ROX_API_TOKEN};roxctl --insecure-skip-tls-verify -e ${ROX_CENTRAL_ADDRESS} image check --image=${NEXUS_REGISTRY}/${imageName}:${devTag} --output=table"
       }
     }
  }
backend app intentionally use jackson-bind that contains CVEs. You can check this in pom.xml
Change ref from cve to master for backend. Branch master already update jackson-bind to updated version.
source:
  contextDir: Jenkinsfile/build-stackrox
  git:
    ref: master
    uri: https://gitlab.com/ocp-demo/backend_quarkus.git
Stackrox Jenkins Plugin
Install Stackrox plugin and restart Jenkins
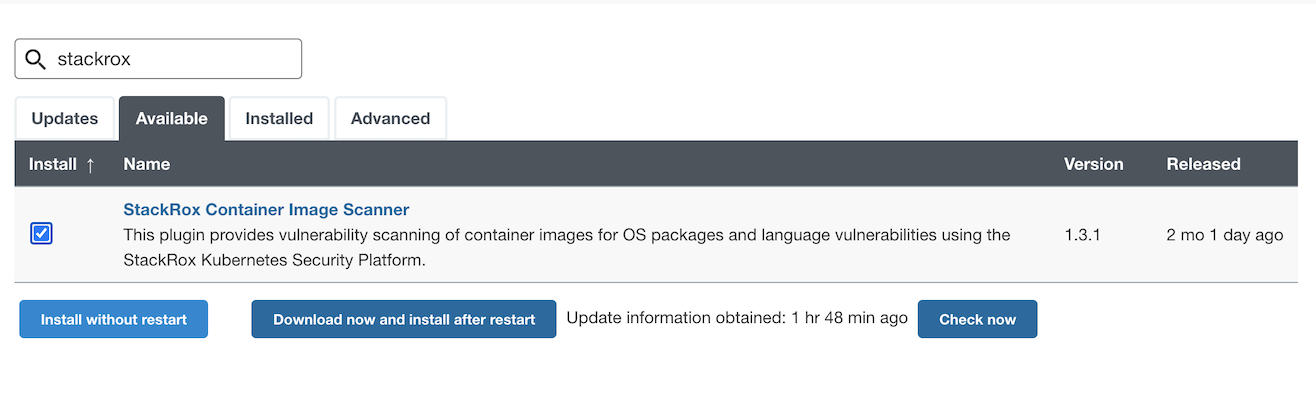
Create buildConfig backend-build-stackrox-with-plugin-pipeline with Jenkins.
cat manifests/backend-build-stackrox-with-plugin-pipeline.yaml| \
sed 's/value: NEXUS_REGISTRY/value: '$(oc get route nexus-registry -n ci-cd -o jsonpath='{.spec.host}')'/' | \
oc create -n ci-cd -f -
Start backend-build-stackrox-with-plugin-pipeline. Pipeline will failed because image contains CVEs and violate policy Fixable Severity at least Important
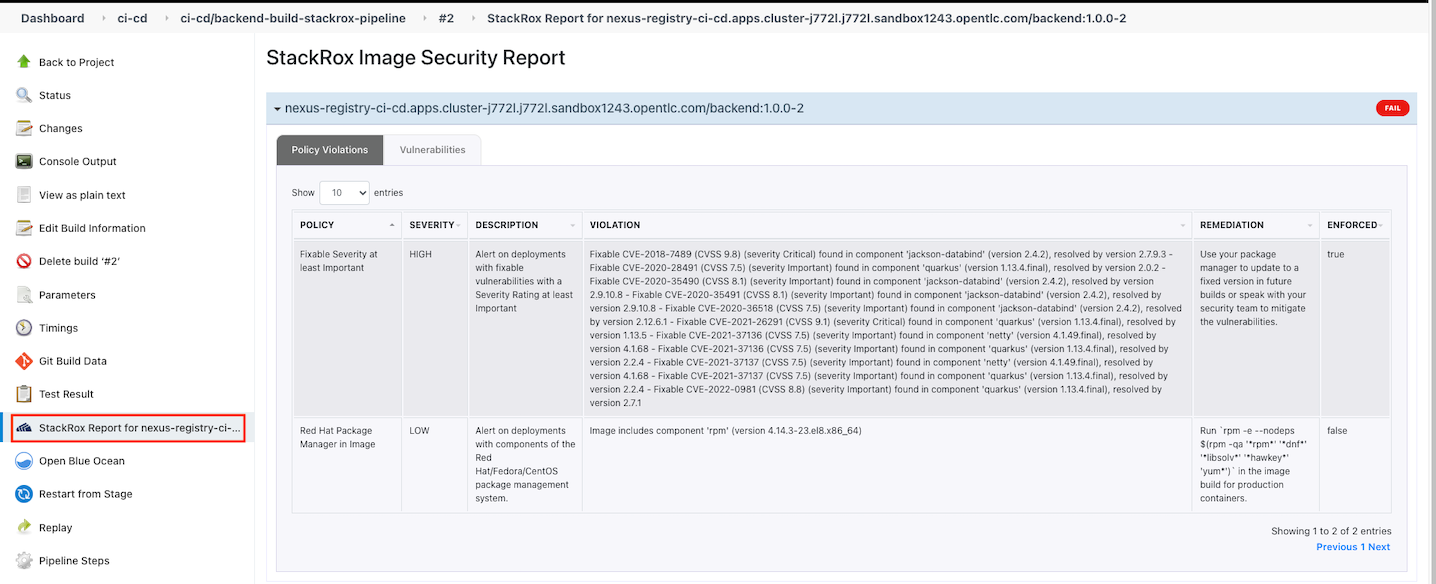
Detailed report in Jenkins
Remark: Jenkinsfile for backend-build-stackrox-with-plugin-pipeline
  stage('Scan Image') {
    steps {
        script {
            echo "Scan image: ${NEXUS_REGISTRY}/${imageName}:${devTag}}"
            stackrox (
                  apiToken: "${ROX_API_TOKEN}",
                  caCertPEM: '',
                  enableTLSVerification: false,
                  failOnCriticalPluginError: true,
                  failOnPolicyEvalFailure: true,
                  portalAddress: "${env.ROX_CENTRAL_ADDRESS}",
                  imageNames: "${NEXUS_REGISTRY}/${imageName}:${devTag}"
            )
        }
      }
  }
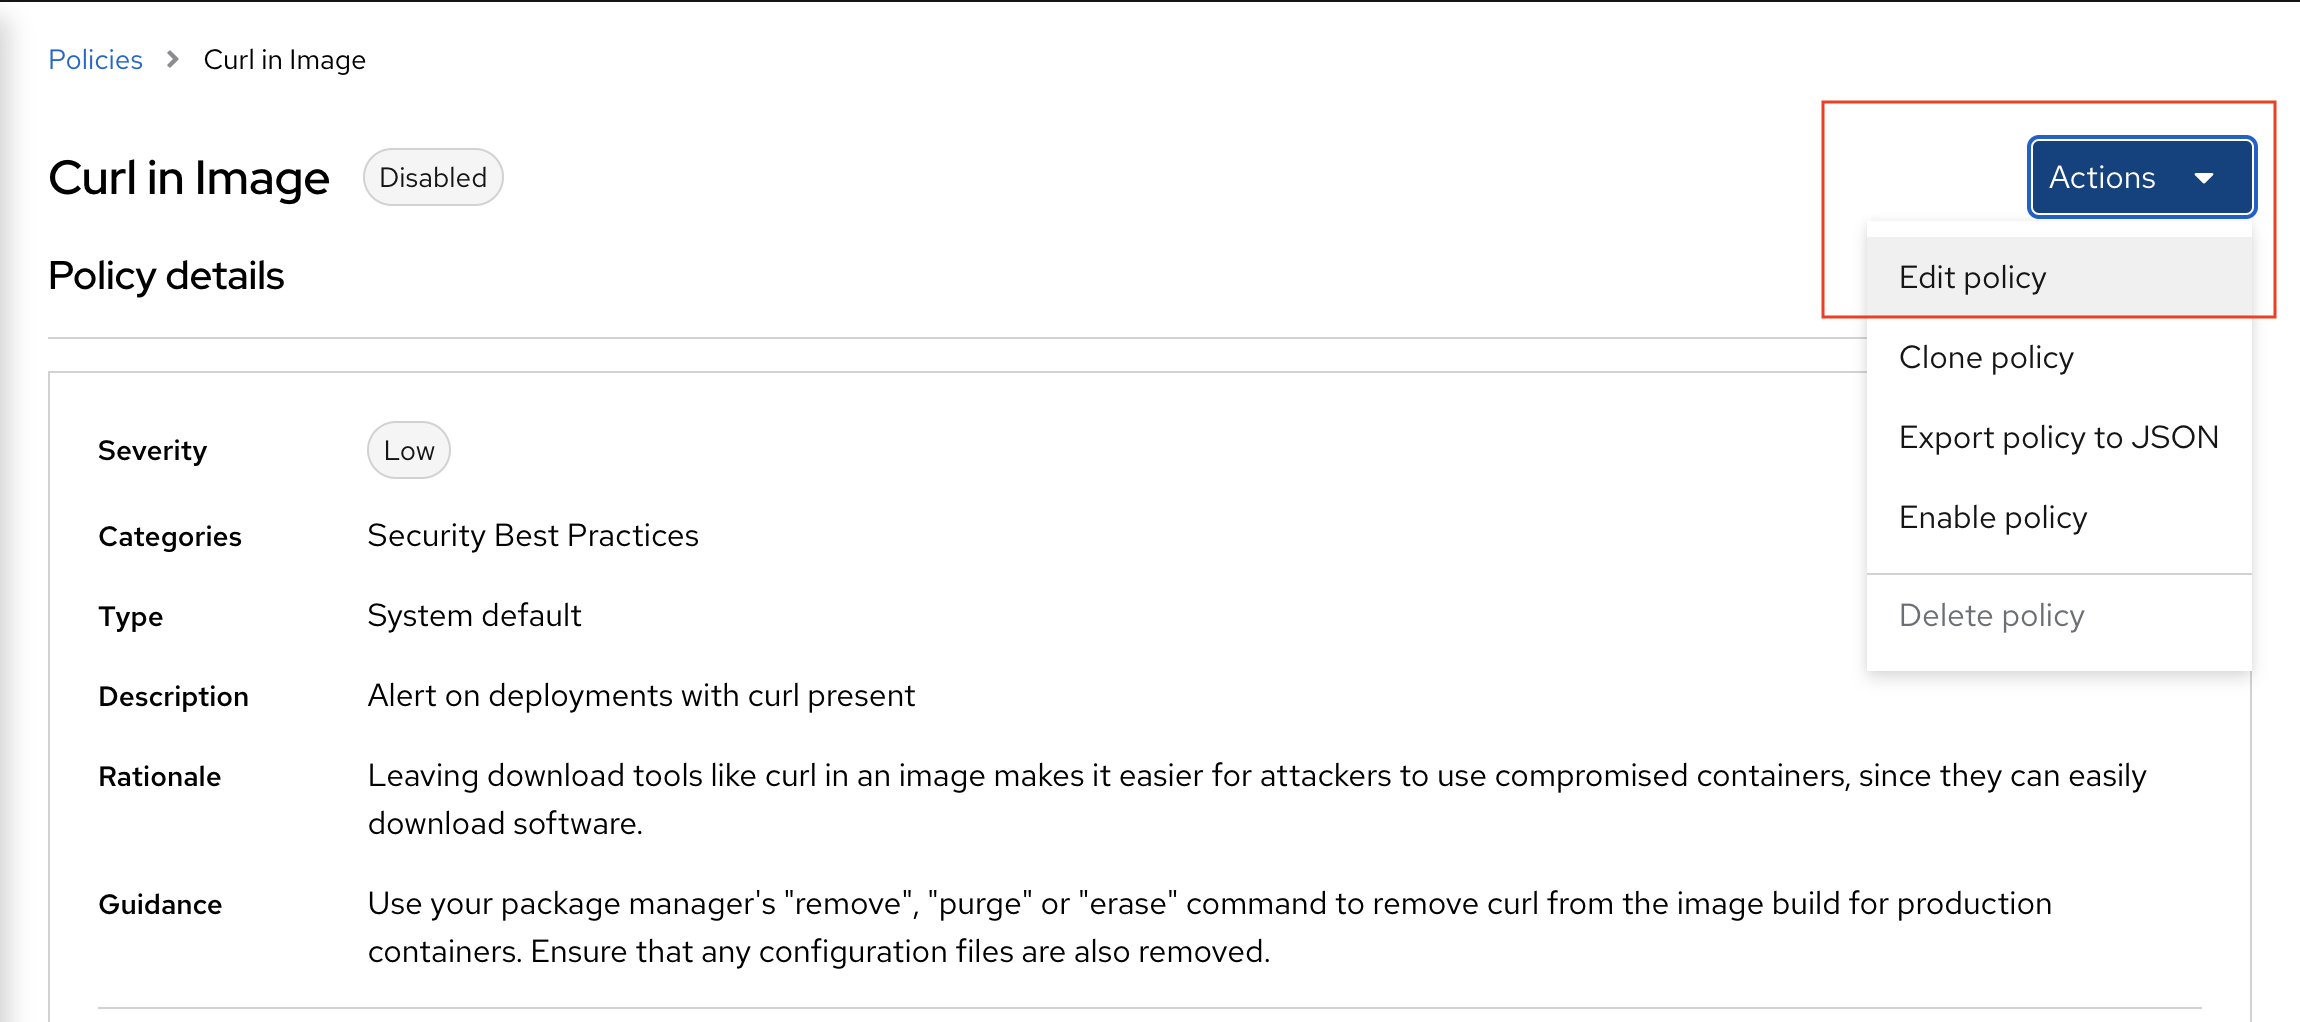
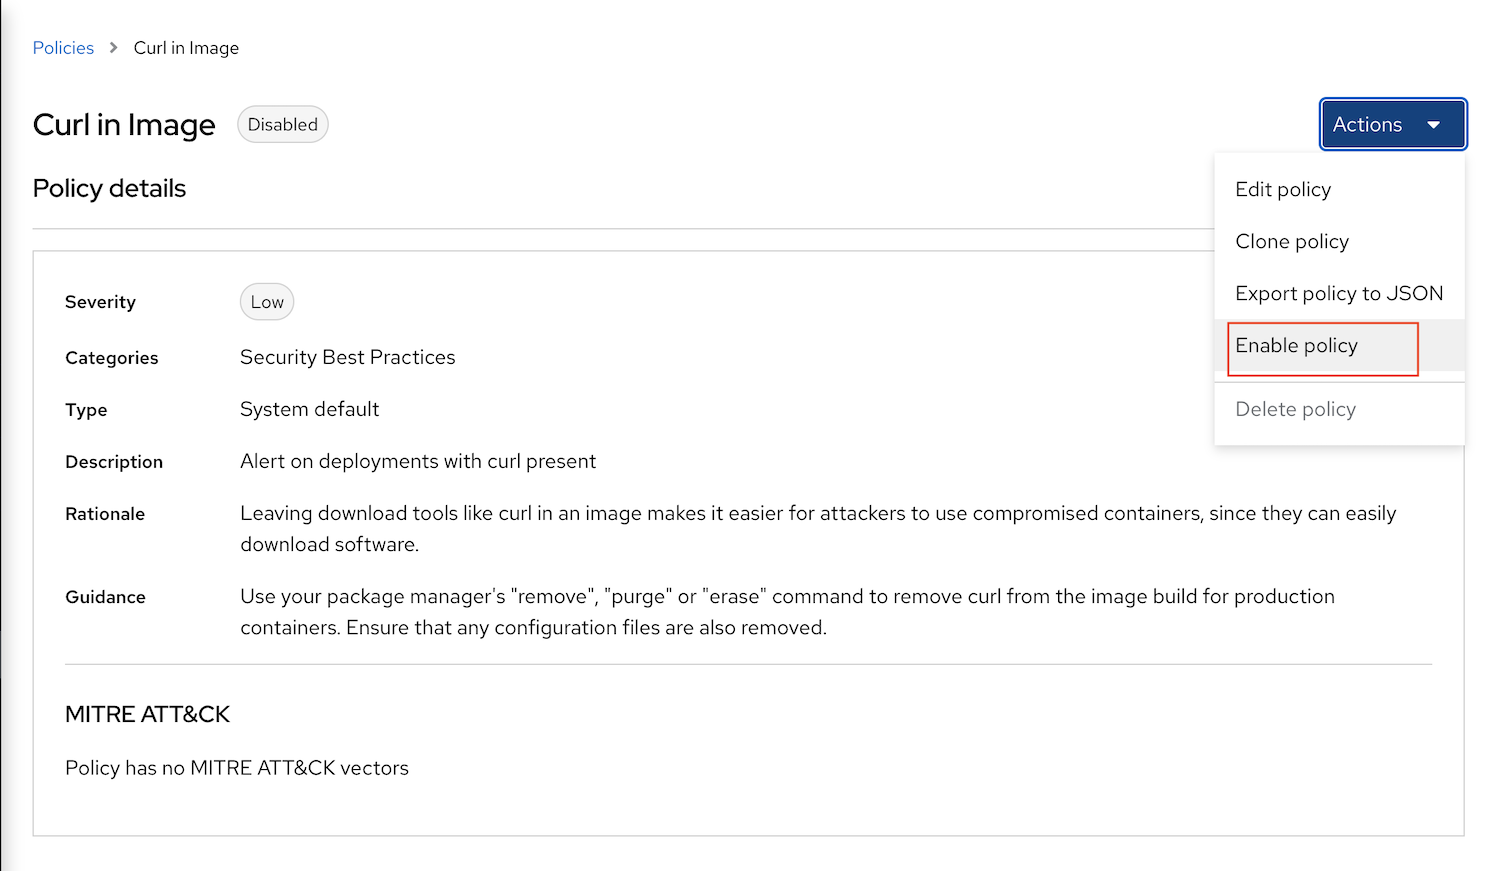
Enable Policy
Login to ACS Console, Select Menu Platform -> Configuration, type policy in search bar then input curl
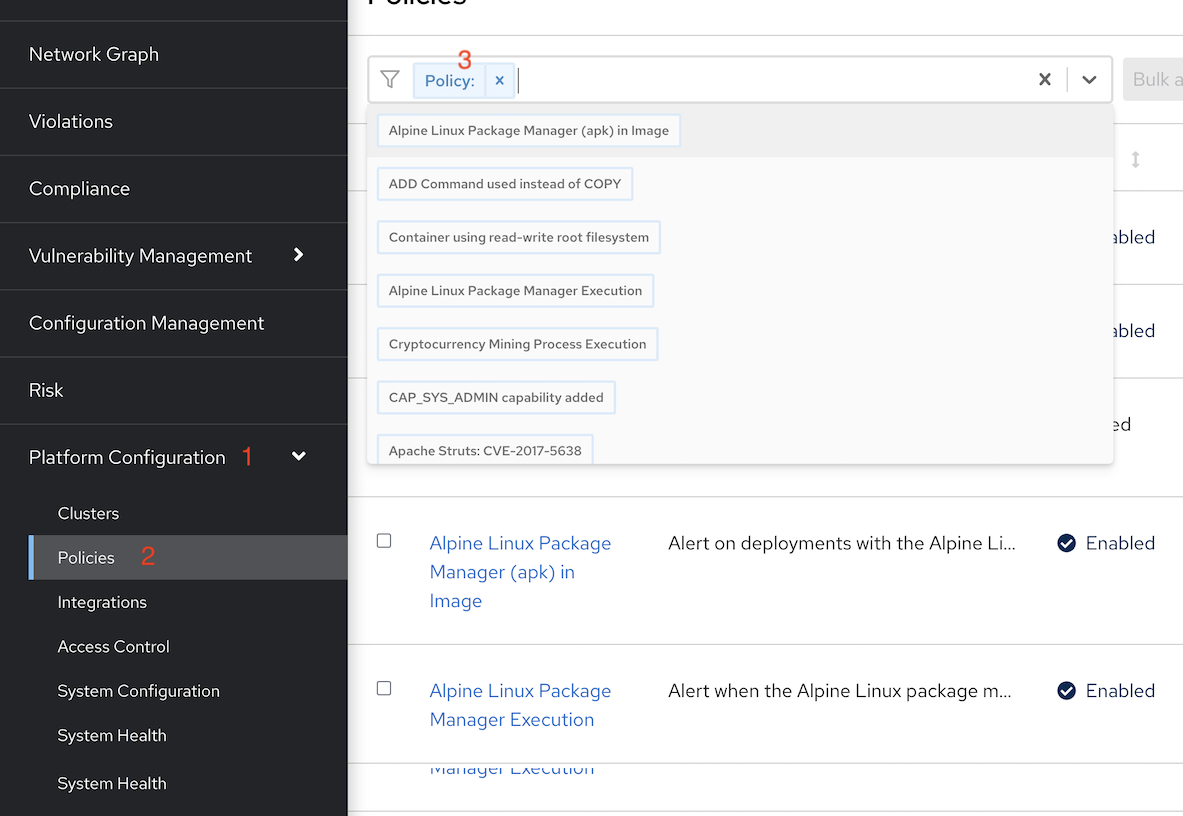
Select policy Curl in image and edit policy
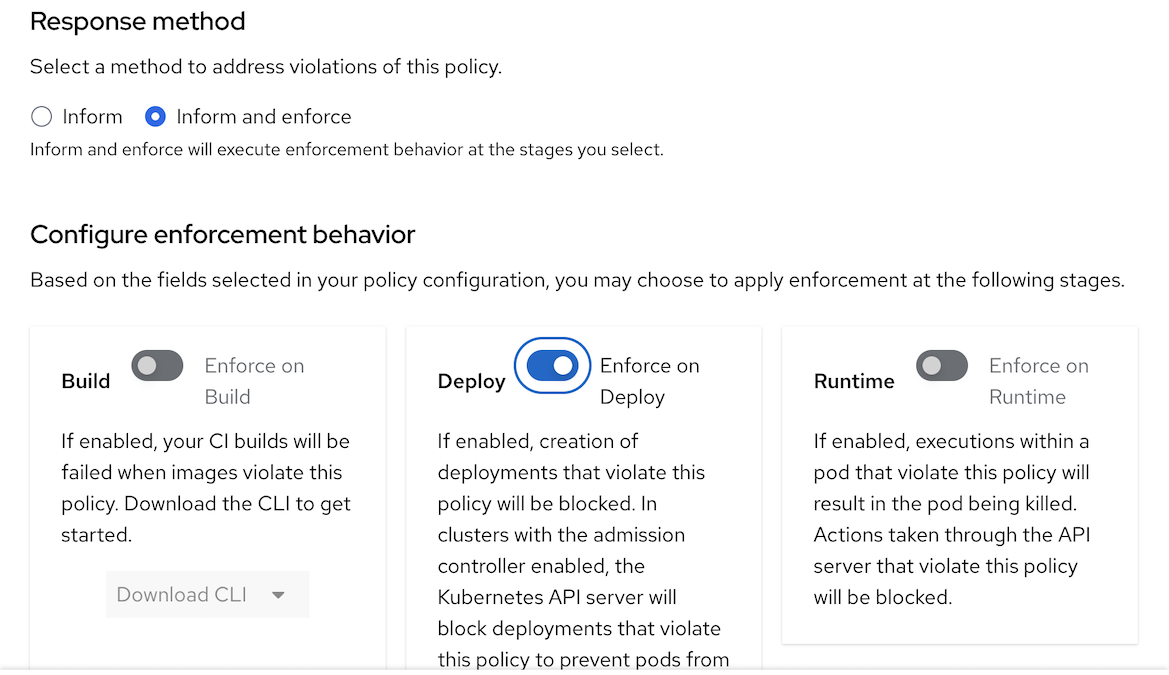
Select policy behavior
- select inform and enforce
enable on build
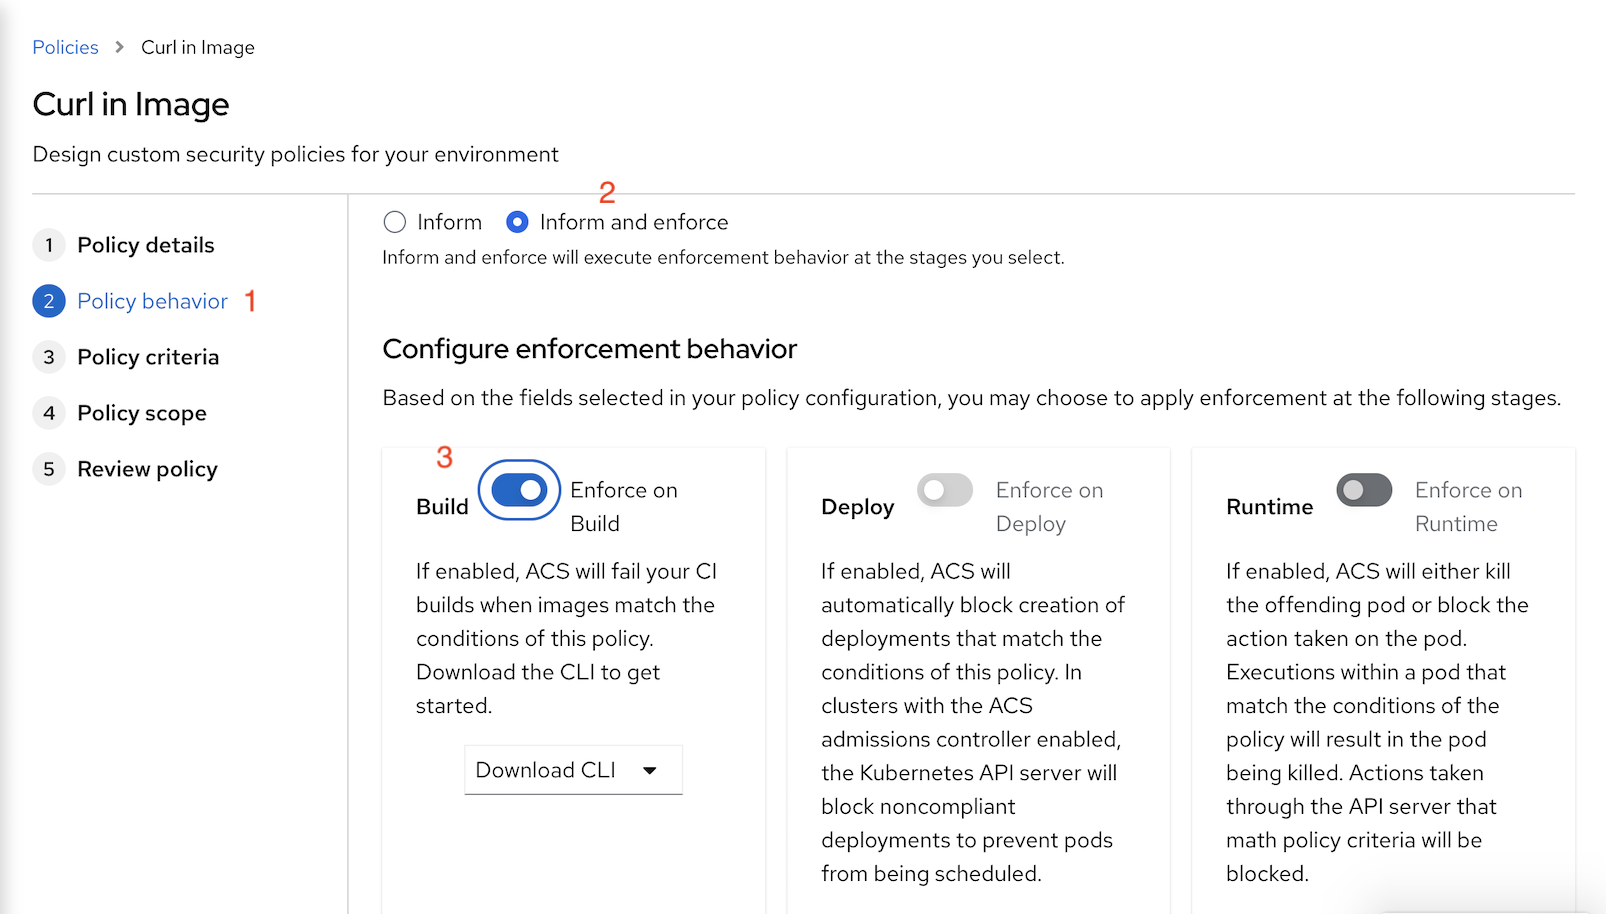
Enable policy curl in image
Re-run Jenkins pipeline backend-build-stackrox-pipeline and check for report

Enforce policy on Deployment Stage
- Create project demo
- Open ACS Central. Navigate to Platform Configuration->Policies
At the search filter. Search for policy No resources requests or limits specified
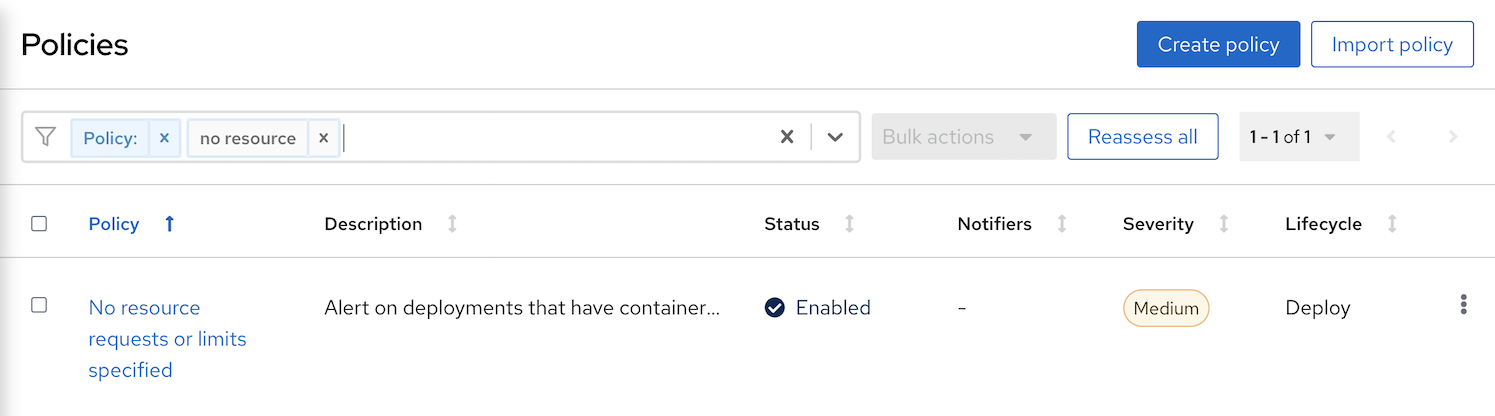
Click Action->Clone Policy and set name to Request and Limit are required
Edit Policy behavior and set response method to Inform and Enforce
Navigate to Policy Scope and Add inclusion scope input following values
- Cluster: Cluster1
- Namespace: demo
- Navigate to Policy Scope and check for Preview violations
Deploy following app
oc create -f manifests/mr-white.yaml -n demoOutput
```bash Error from server (Failed currently enforced policies from StackRox): error when creating "manifests/mr-white.yaml": admission webhook "policyeval.stackrox.io" denied the request: The attempted operation violated 1 enforced policy, described below:
Policy: Request and Limit are required
- Description: ↳ Alert on deployments that have containers without resource requests and limits
- Rationale:
↳ If a container does not have resource requests or limits specified then the host
may become over-provisioned. - Remediation: ↳ Specify the requests and limits of CPU and Memory for your deployment.
- Violations:
- CPU limit set to 0 cores for container 'mr-white'
- CPU request set to 0 cores for container 'mr-white'
- Memory limit set to 0 MB for container 'mr-white'
- Memory request set to 0 MB for container 'mr-white'
In case of emergency, add the annotation {"admission.stackrox.io/break-glass": "ticket-1234"} to your deployment with an updated ticket number
- ACS Console, navigate to Violations

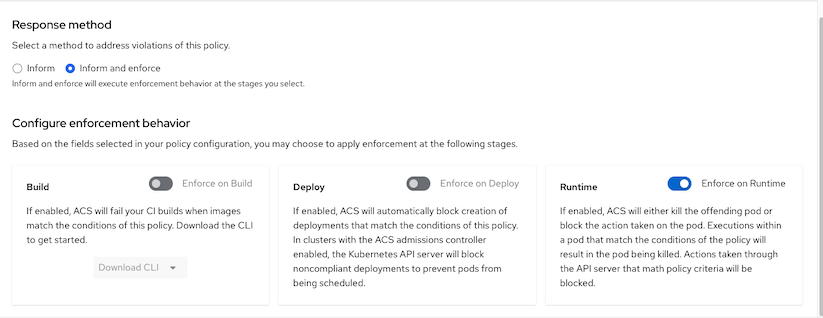
## Enforce policy on Runtime Stage
### Exec into Pod
- Platform configuration -> Policies
- Search for Policy Kubernetes Actions: Exec into Pod
- Click Action -> Edit Policy
- Click Next to Policy Behavior and enable Enforce on runtime. This will make ACS kill the offend pod that try to run exec.
- Save Policy
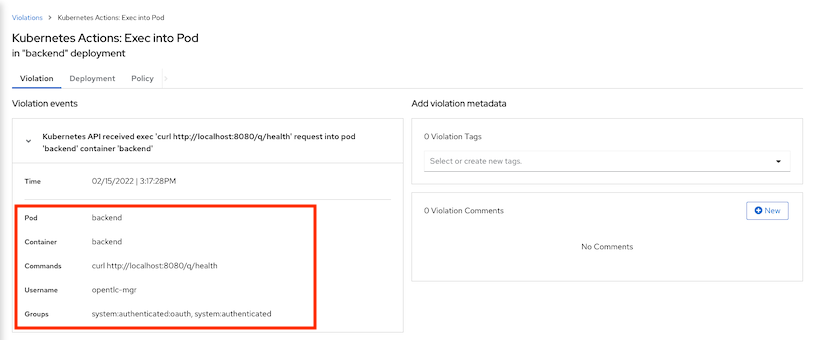
- Run curl inside backend's pod
```bash
oc new-project project1
oc apply -f manifests/backend-v1.yaml -n project1
oc exec -n project1 $(oc get pods -n project1 -l app=backend --no-headers | head -n 1 | awk '{print $1}') -- curl -s http://backend:8080
Output

```bash
command terminated with exit code 6
```
Check Console
Navigate to Dashboard -> Violation

Details information
NMAP
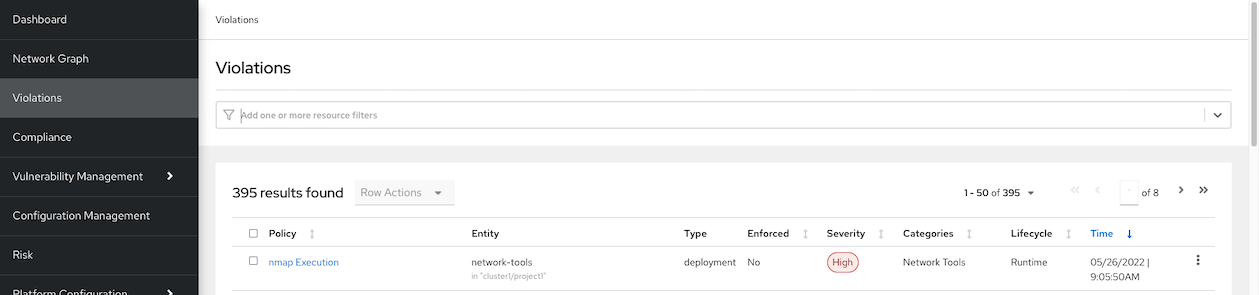
- Platform configuration -> Policies
- Search for nmap Execution
- Verify that status is enabled
Deploy container tools
oc apply -f manifests/network-tools.yaml -n project1Execute namp
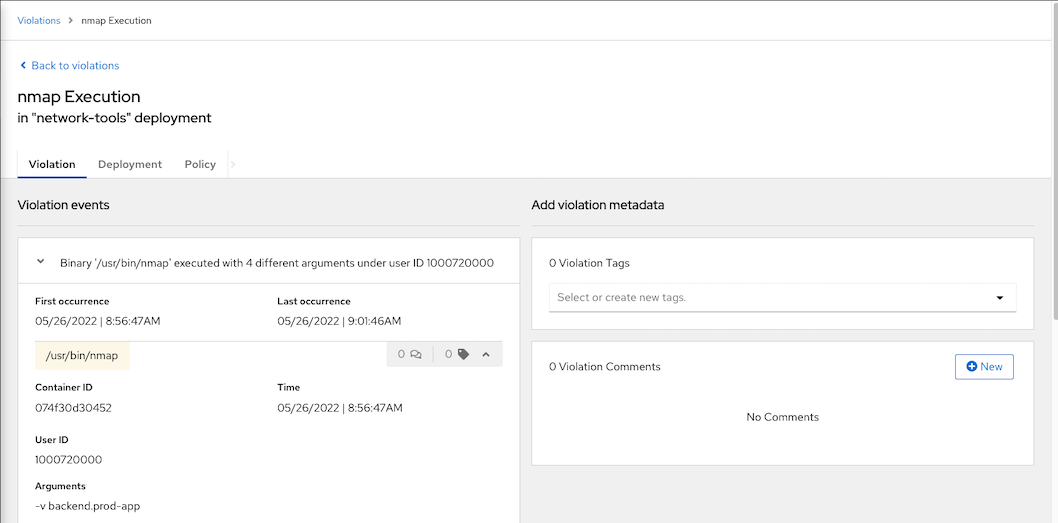
oc exec $(oc get pods -l app=network-tools --no-headers -n project1 | head -n 1 | awk '{print $1}') -n project1 -- nmap -v -Pn backend.prod-app.svcOutput
Starting Nmap 7.70 ( https://nmap.org ) at 2022-05-26 02:05 UTC
Initiating Parallel DNS resolution of 1 host. at 02:05
Completed Parallel DNS resolution of 1 host. at 02:05, 0.00s elapsed
Initiating Connect Scan at 02:05
Scanning backend.prod-app.svc (172.30.14.34) [1000 ports]
Discovered open port 8080/tcp on 172.30.14.34
Completed Connect Scan at 02:05, 4.31s elapsed (1000 total ports)
Nmap scan report for backend.prod-app.svc (172.30.14.34)
Host is up (0.0019s latency).
rDNS record for 172.30.14.34: backend.prod-app.svc.cluster.local
Not shown: 999 filtered ports
PORT     STATE SERVICE
8080/tcp open  http-proxy

Read data files from: /usr/bin/../share/nmap
Nmap done: 1 IP address (1 host up) scanned in 4.44 seconds
Check ACS Central. Navigate to Violations
nmap execution is detected
details information
Violation
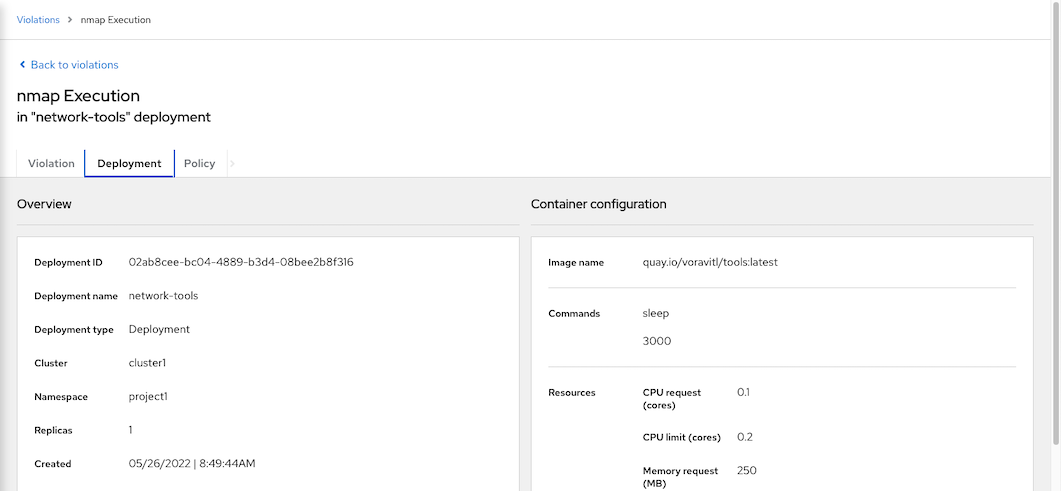
Deployment
Compliance
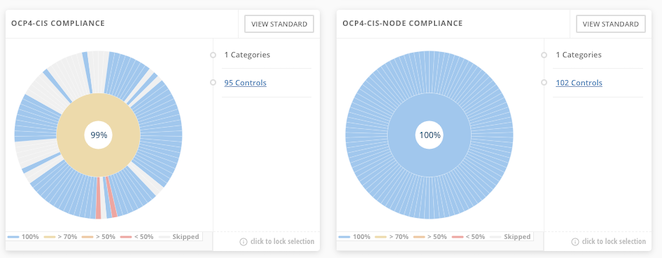
Initial compliance scan

Overall reports
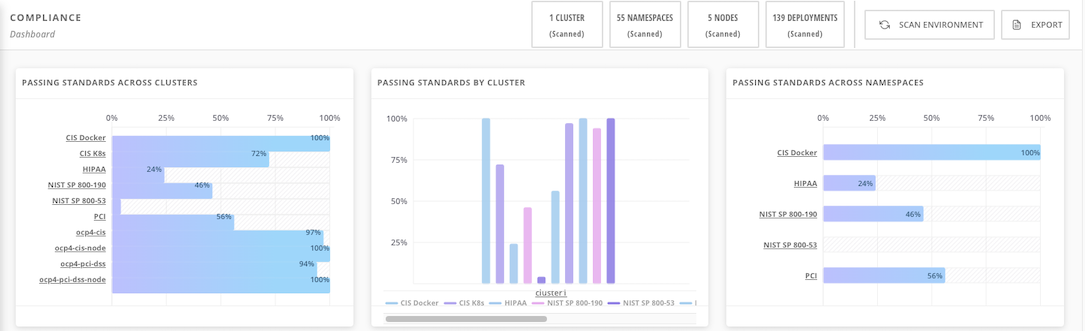
Compliance Operator
ACS integrated with OpenShift Compliance Operator. Following show result for OpenShift Compliance Operator with CIS profile and already remidiated by Operator
Network Graph
Sample Application
Deploy frontend and backend app on namespace ui and api respectively
oc new-project ui
oc new-project api
oc create -f manifests/frontend.yaml -n ui
oc create -f manifests/backend-v1.yaml -n api
oc expose deployment/backend-v1 -n api
oc set env deployment/frontend-v1 BACKEND_URL=http://backend-v1.api.svc:8080 -n ui
oc set env deployment/frontend-v2 BACKEND_URL=http://backend-v1.api.svc:8080 -n ui
Check for frontend URL
FRONTEND_URL=$(oc get route/frontend -o jsonpath='{.spec.host}' -n ui)Test with curl
curl https://$FRONTEND_URLNetwork Policies
Check Network Graph in ACS Console
- Select cluster1 then select namespace ui and api
Click deployment backend-v1
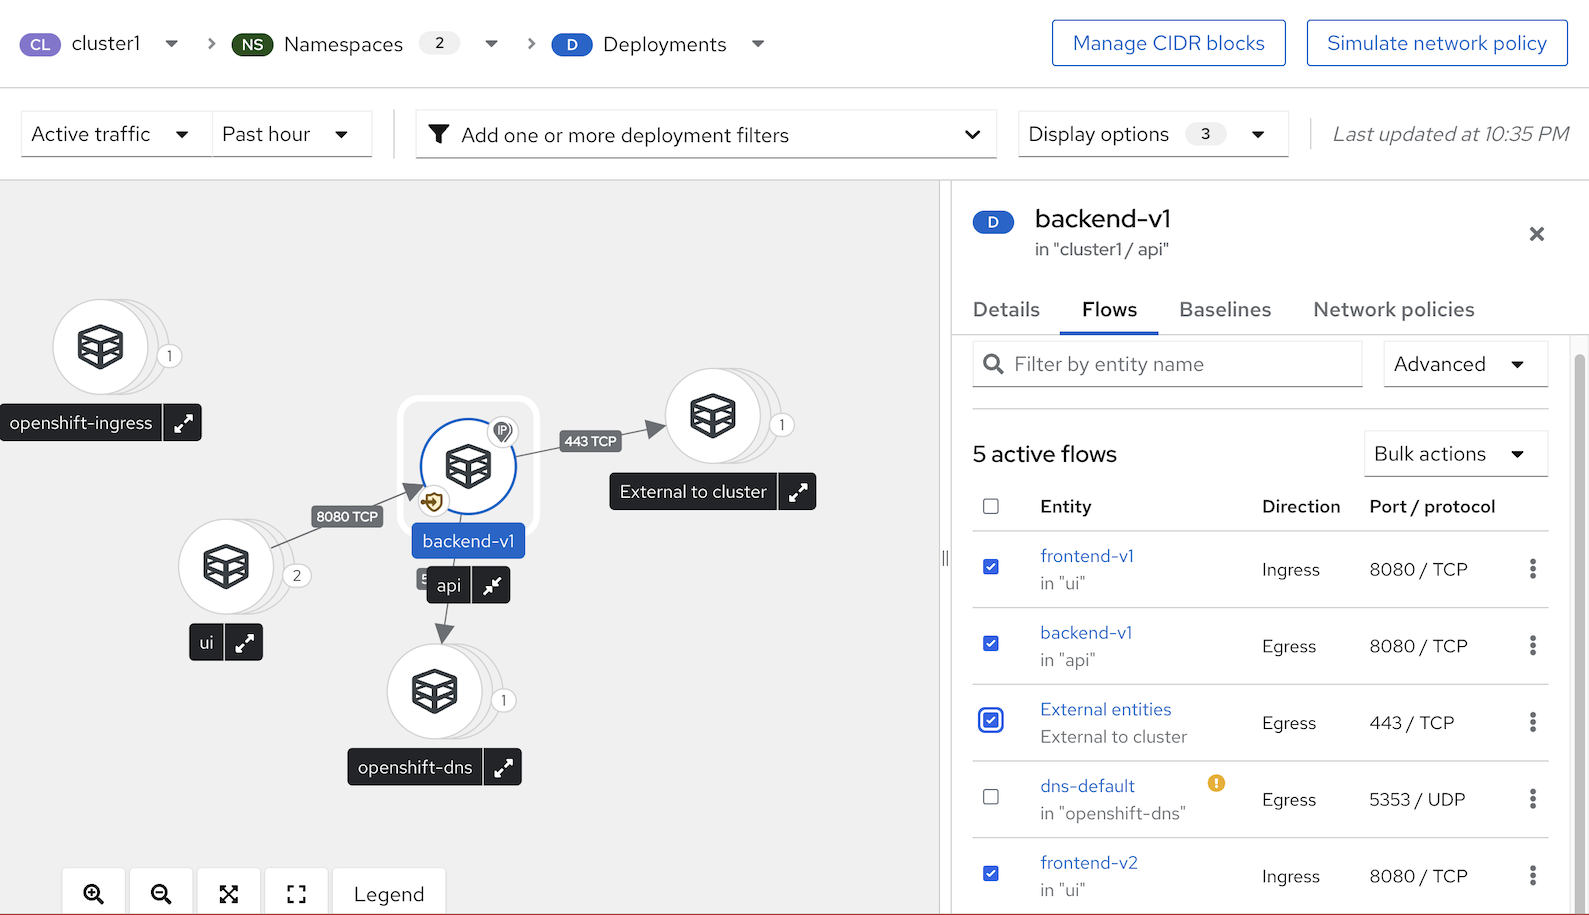
Select tab Flows
- Ingress from frontend-v1 in namespace ui
- Ingress from frontend-v2 in namespace ui
- Egress from backend-v1 in namespace api
- Egress from backend-v1 to external entities
- Select above entries and Add to Baseline
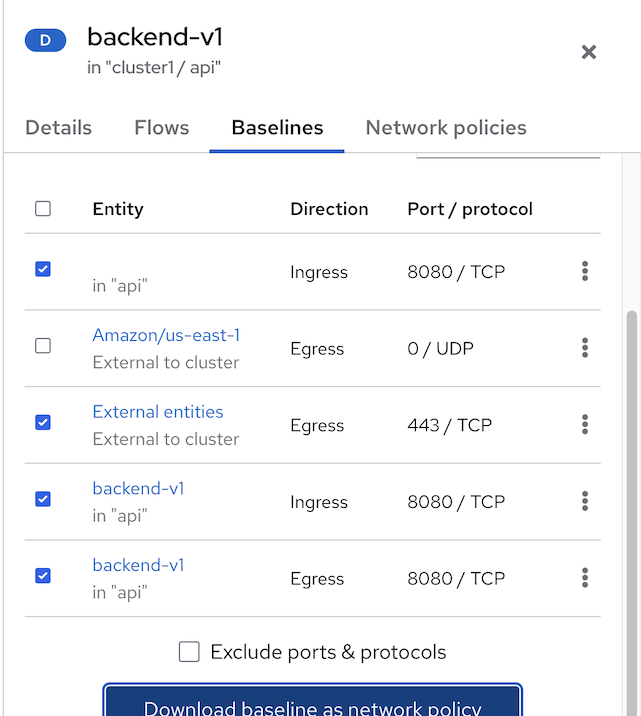
- Click tab Baselines then click Download baseline as network policy
Check network policies which created from actual traffic baseline
apiVersion: networking.k8s.io/v1
kind: NetworkPolicy
metadata:
  creationTimestamp: "2023-04-18T16:04:11Z"
  labels:
    network-policy-generator.stackrox.io/from-baseline: "true"
  name: stackrox-baseline-generated-backend-v1
  namespace: api
spec:
  ingress:
  - from:
    - namespaceSelector:
        matchLabels:
          kubernetes.io/metadata.name: ui
      podSelector:
        matchLabels:
          app: frontend
          version: v2
    - namespaceSelector:
        matchLabels:
          kubernetes.io/metadata.name: ui
      podSelector:
        matchLabels:
          app: frontend
          version: v1
    - podSelector:
        matchLabels:
          app: backend
          version: v1
    ports:
    - port: 8080
      protocol: TCP
  podSelector:
    matchLabels:
      app: backend
      version: v1
  policyTypes:
  - Ingress
status: {}